20 KiB
NOTICE: This documentation is not current as of September 2022. After I finished the refactoring I'll upgrade it.
1. Overview
This package provides an API for the Bind nameserver. It consists of two parts, the API itself and a CLI tool to configure the available functions.
2. Features
2.1. CLI
The CLI is used to perform configuration and some checks:
- check
- Permissions: The API needs to be able to access some files and create new ones
- Panels: This checks one or all panels if every nameserver is aware of all domains
- Domain: Check is all support files for domains on this NS are existing
- panels
- List: List all panels which are configured on this server
- Create: Adds a new panel to the configuration
- Update: Changes one or more parameters of the panel
- Delete: Deletes the given panel
- ApiPing: Calls the /ping endpoint of the given server or all if no Panel is specified
- some additional API call might be added
- nameservers
- similar to panels, but for the nameservers
- domains
- similar usage to panels/domains, manage all slave zones
- apikeys
- manage the keys to access this nameserver via API
2.2. API
The API is a RESTful API, there is a self explaining Swagger/OpenAPI available.
3. Installation
You can install the bindAPI on either a standalone server or an existing KeyHelp Panel. However, slave zones are only managed for masters which lie on Keyhelp panels.
3.1. Installation on a KeyHelp panel
In KeyHelp, install PHP 8.1. This is mandatory, the API relies on features only available since PHP 8.0. It might run on PHP 8.0 but has not been tested as there is no reason not to install PHP 8.1.
So head over to:
Settings => Configuration => Feature Settings => PHP Interpreter
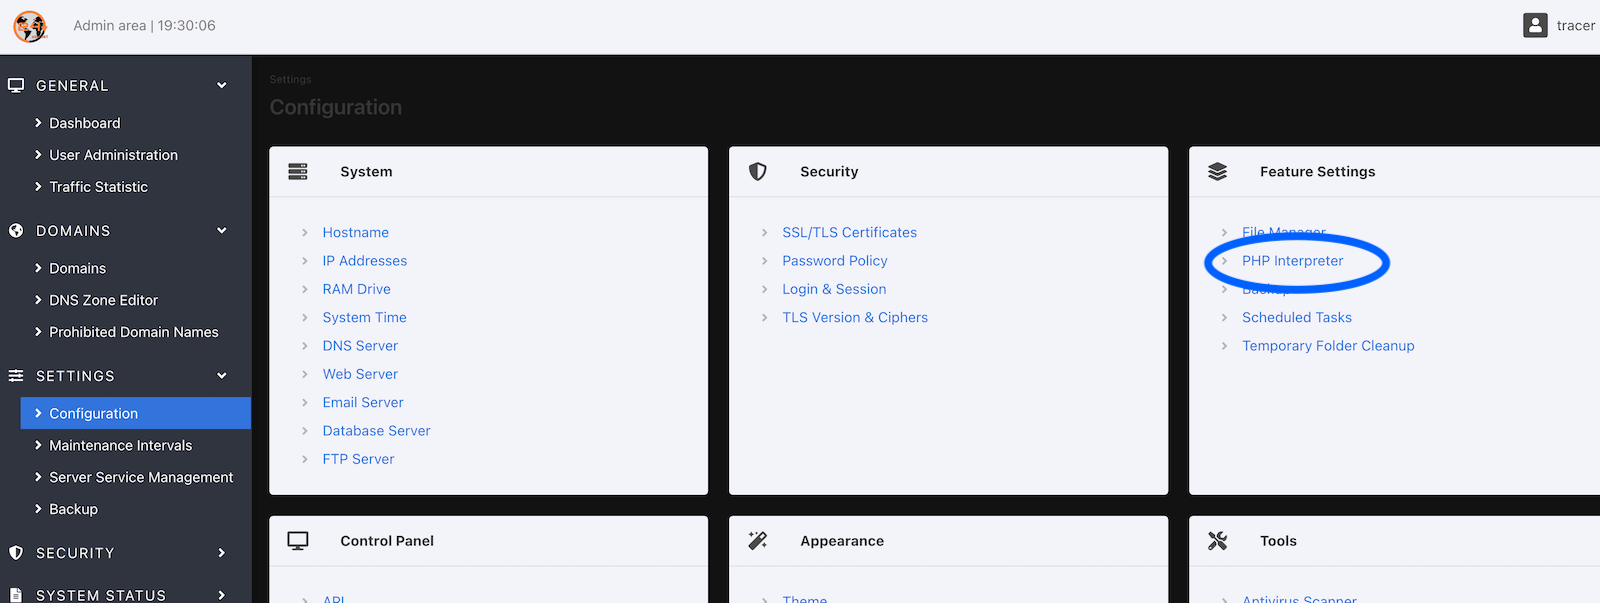
Set the checkmark and press Save.
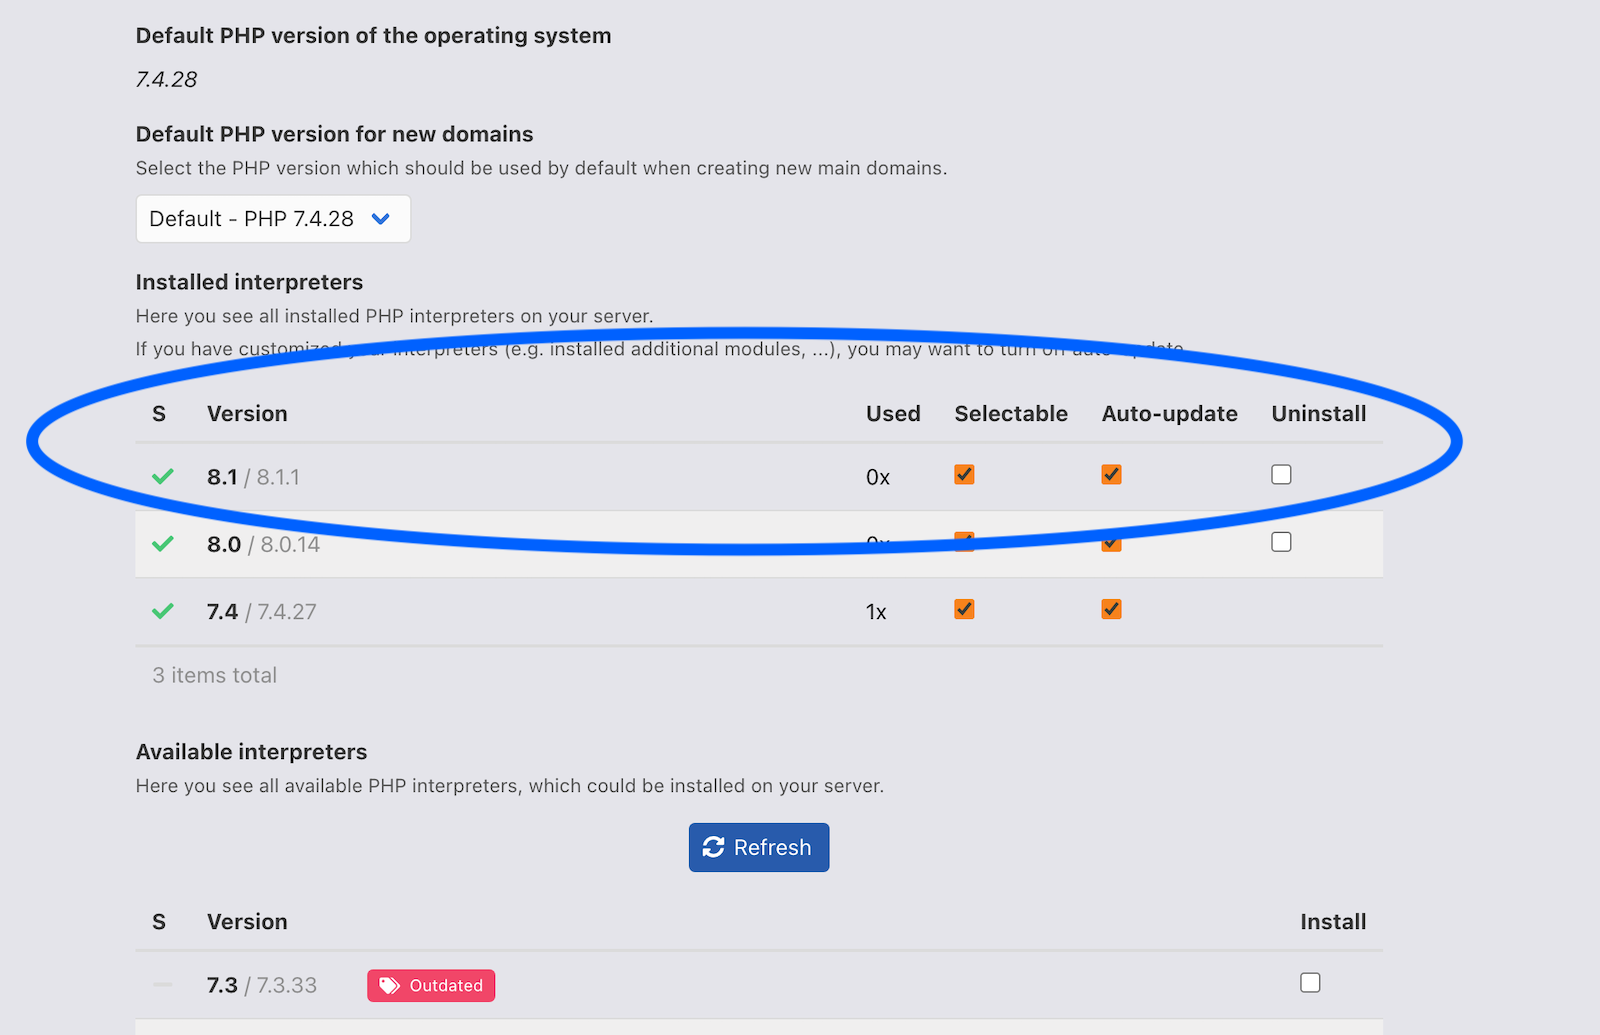
Wait about a minute, the installation is started via a cronjob which runs every minute.
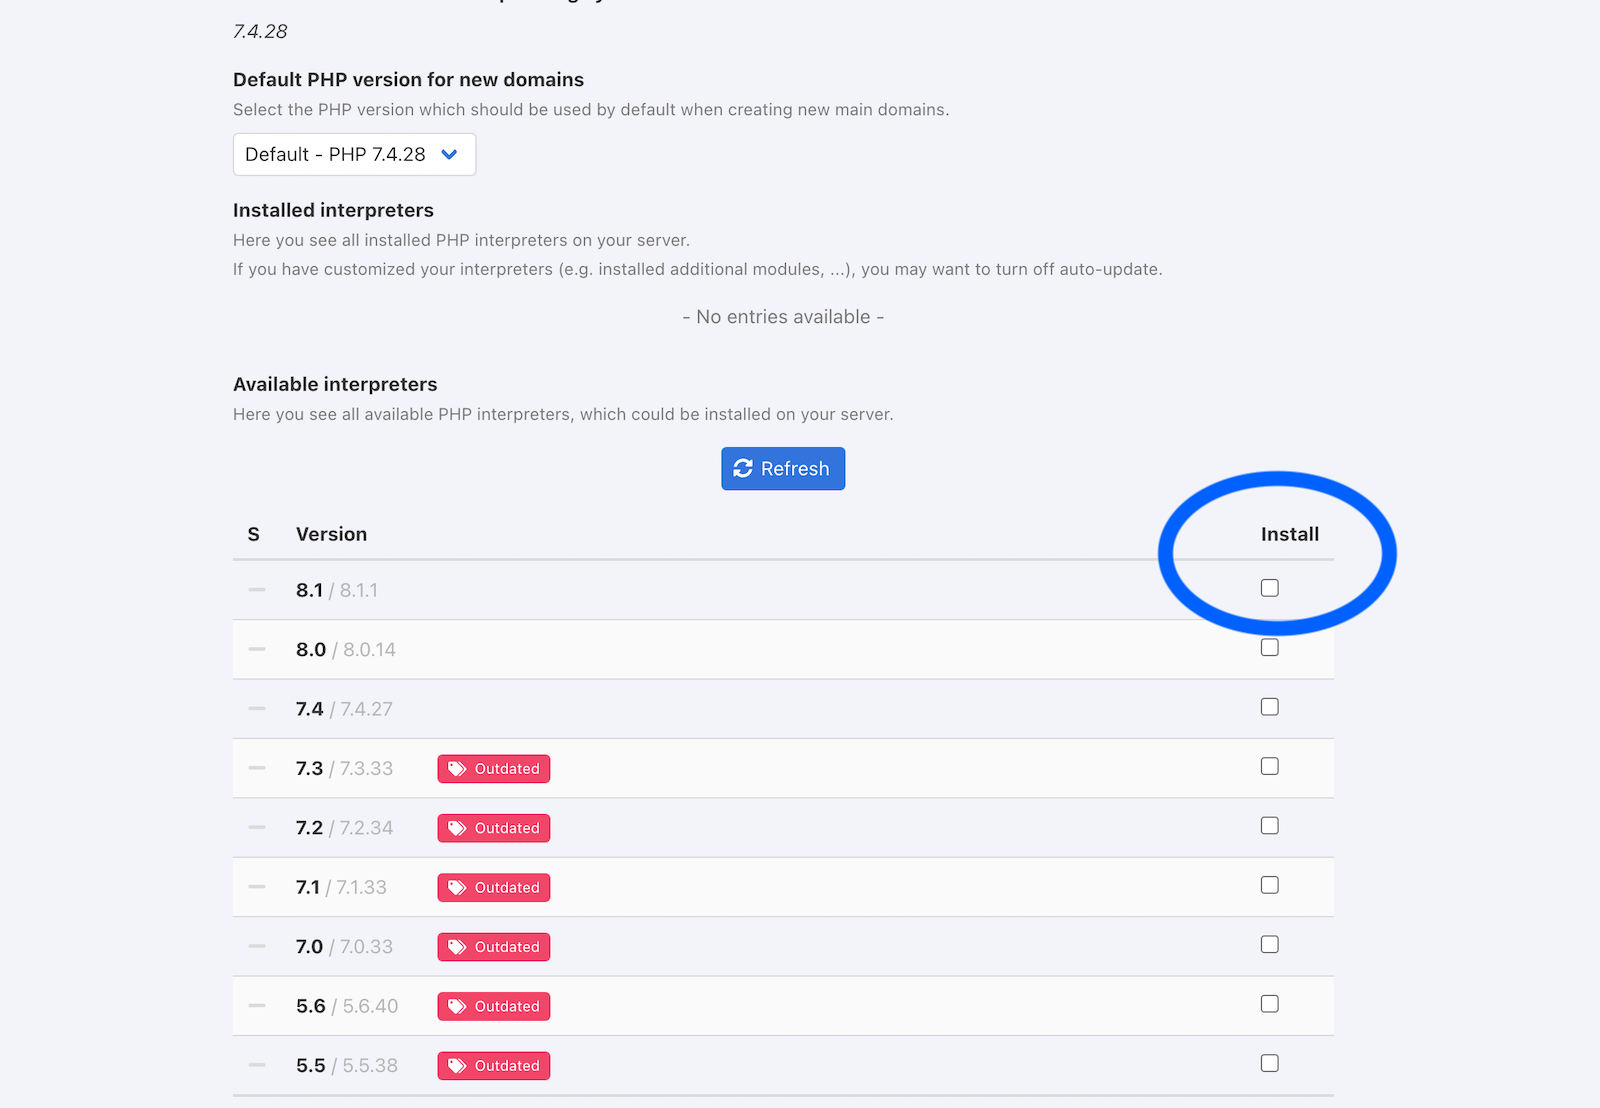
Now you see the newly installed PHP interpreters:
Next create a domain, e.g. ns1.24unix.net:
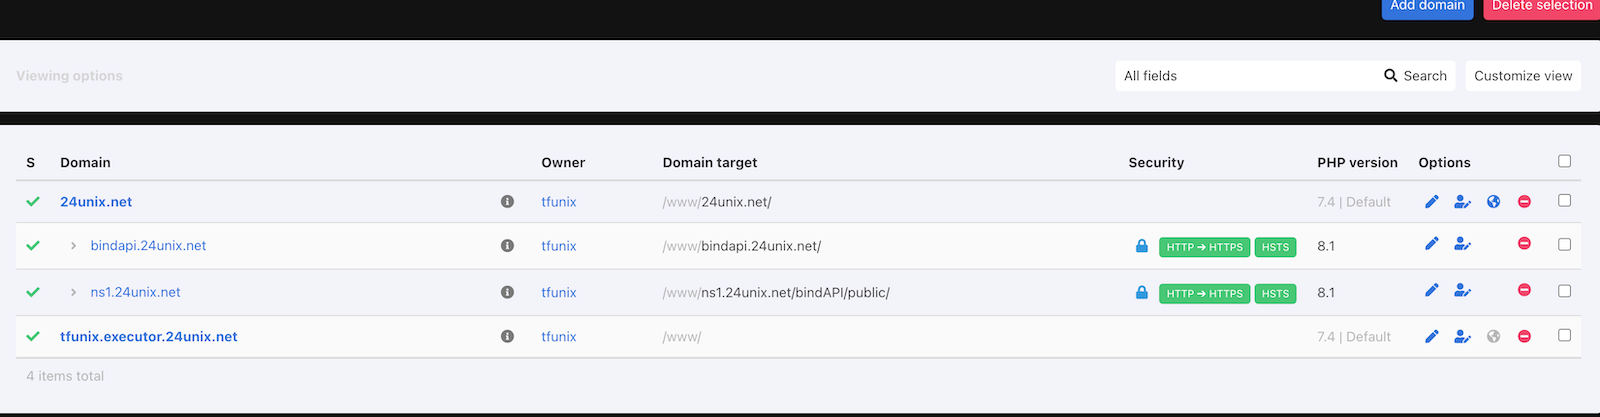
I created the domain in ns1.24unix.net below the /www folder.
We'll change the base directory later.
Now we need to log into our server, using e.g. iTerm2 or under Linux whichever terminal you prefer.
As root (or via sudo):
apt install git wget
We need this to check out the bindAPi from git later.
So as we are still root, we need to install composer, two reasonable locations are under ~/bindAPI/bin or /usr/local/bin. (~ stands for the home folder) Here I will install it under /usr/local/bin, in the example with the standalone server I'll install it under /bindAPI/bin.
wget https://getcomposer.org/installer
php installer --install-dir=/usr/local/bin --filename=composer
Now we can change into our new user, remind to give him shell access in the panel.
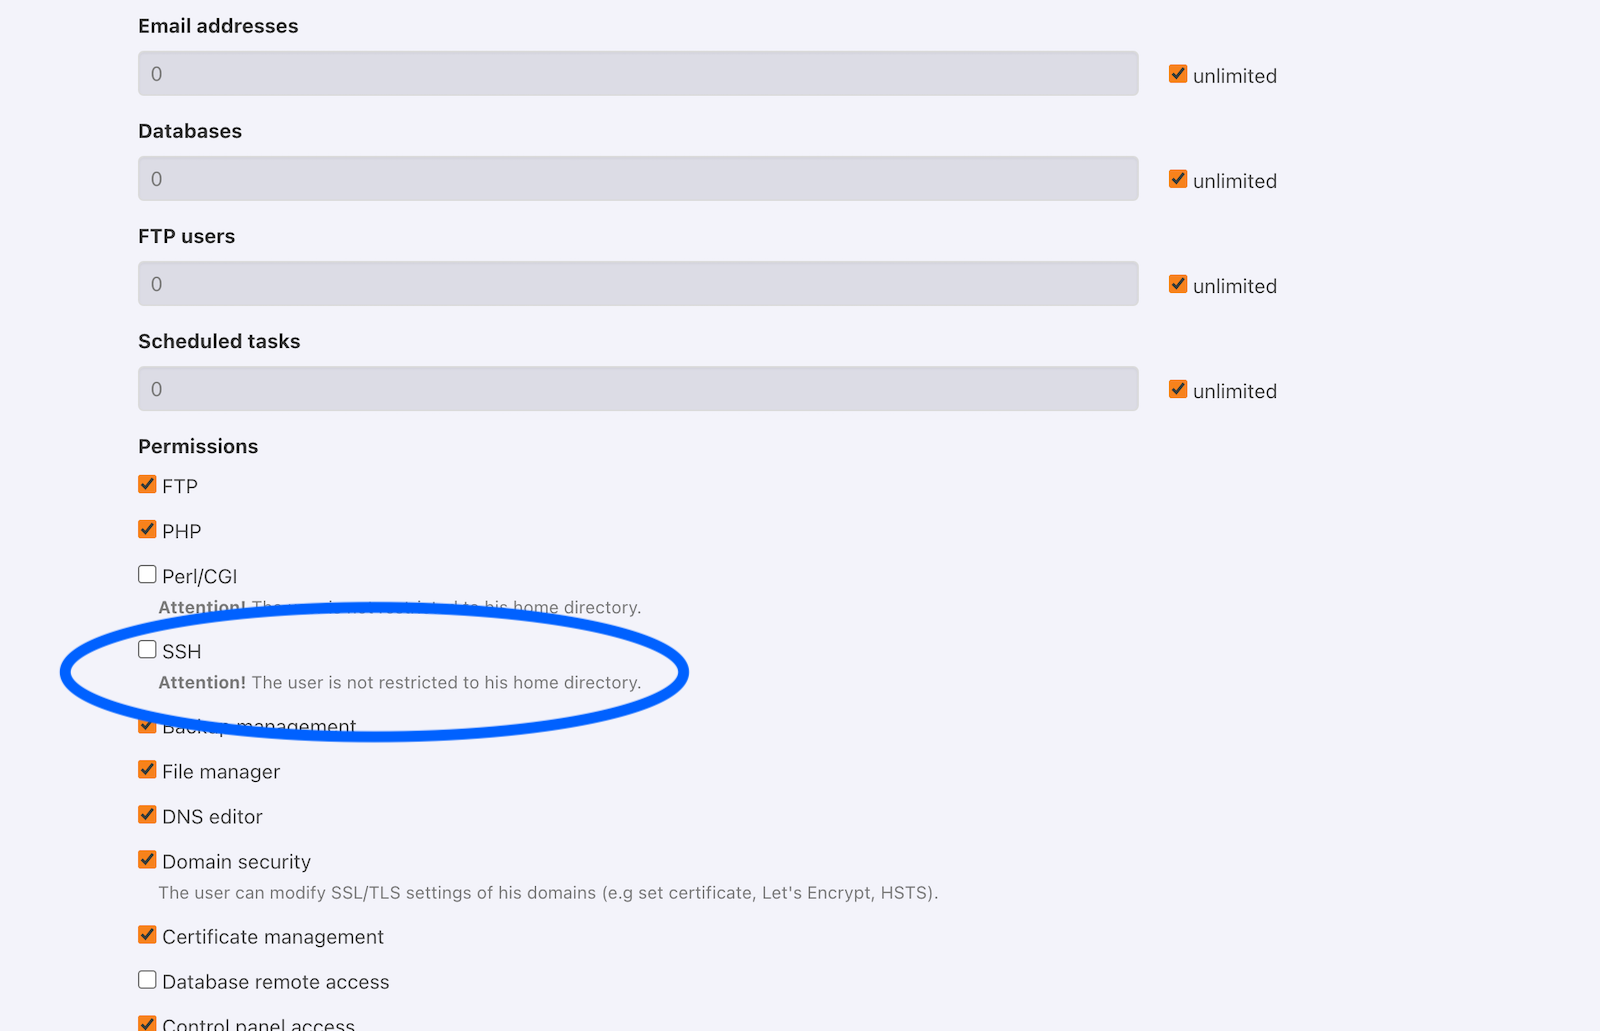
su - tfunix
In my example I assume the user is called tfunix, his home points to /home/users/tfunix.
Base directory for the bindAPI is ~/www/ns1.24unix.net/bindApi.
So, we head over to our directory:
cd www/ns1.24unix.net/bindAPI
Remove the defaults files:
rm *
Next, we'll need to fetch the bindAPI. As of now, the latest release is 1.0.1: https://git.24unix.net/tracer/bindAPI/archive/1.0.1.tar.gz
I'd suggest checking here for the latest version: https://git.24unix.net/tracer/bindAPI/releases
Or just use git to check out the latest update:
git clone https://git.24unix.net/tracer/bindAPI.git
Cloning into 'bindAPI'...
remote: Enumerating objects: 878, done.
remote: Counting objects: 100% (878/878), done.
remote: Compressing objects: 100% (670/670), done.
remote: Total 878 (delta 510), reused 225 (delta 139), pack-reused 0
Receiving objects: 100% (878/878), 3.25 MiB | 4.46 MiB/s, done.
Resolving deltas: 100% (510/510), done.
We need to pull the dependencies for composer:
/usr/bin/keyhelp-php81 /usr/local/bin/composer update
You might notice a quite strange command. We need to call php with full path, and explicitly the 8.1 version. KeyHelp relies on the default PHP installation, so the php binary will always point to 7.4 when you're on Debian Bullseye.
So, in bin/console the path to /usr/bin/keyhelp-php81 is hardcoded after the shebang, a step we have to remind if we install the standalone version.
Now make the CLI executable:
chmod +x bin/console
And give it a try:
% ./bin/console
Missing config file
Should I create a new config based on config.json.sample? (y/N): n
You first have to setup the bindAPI. Bye.
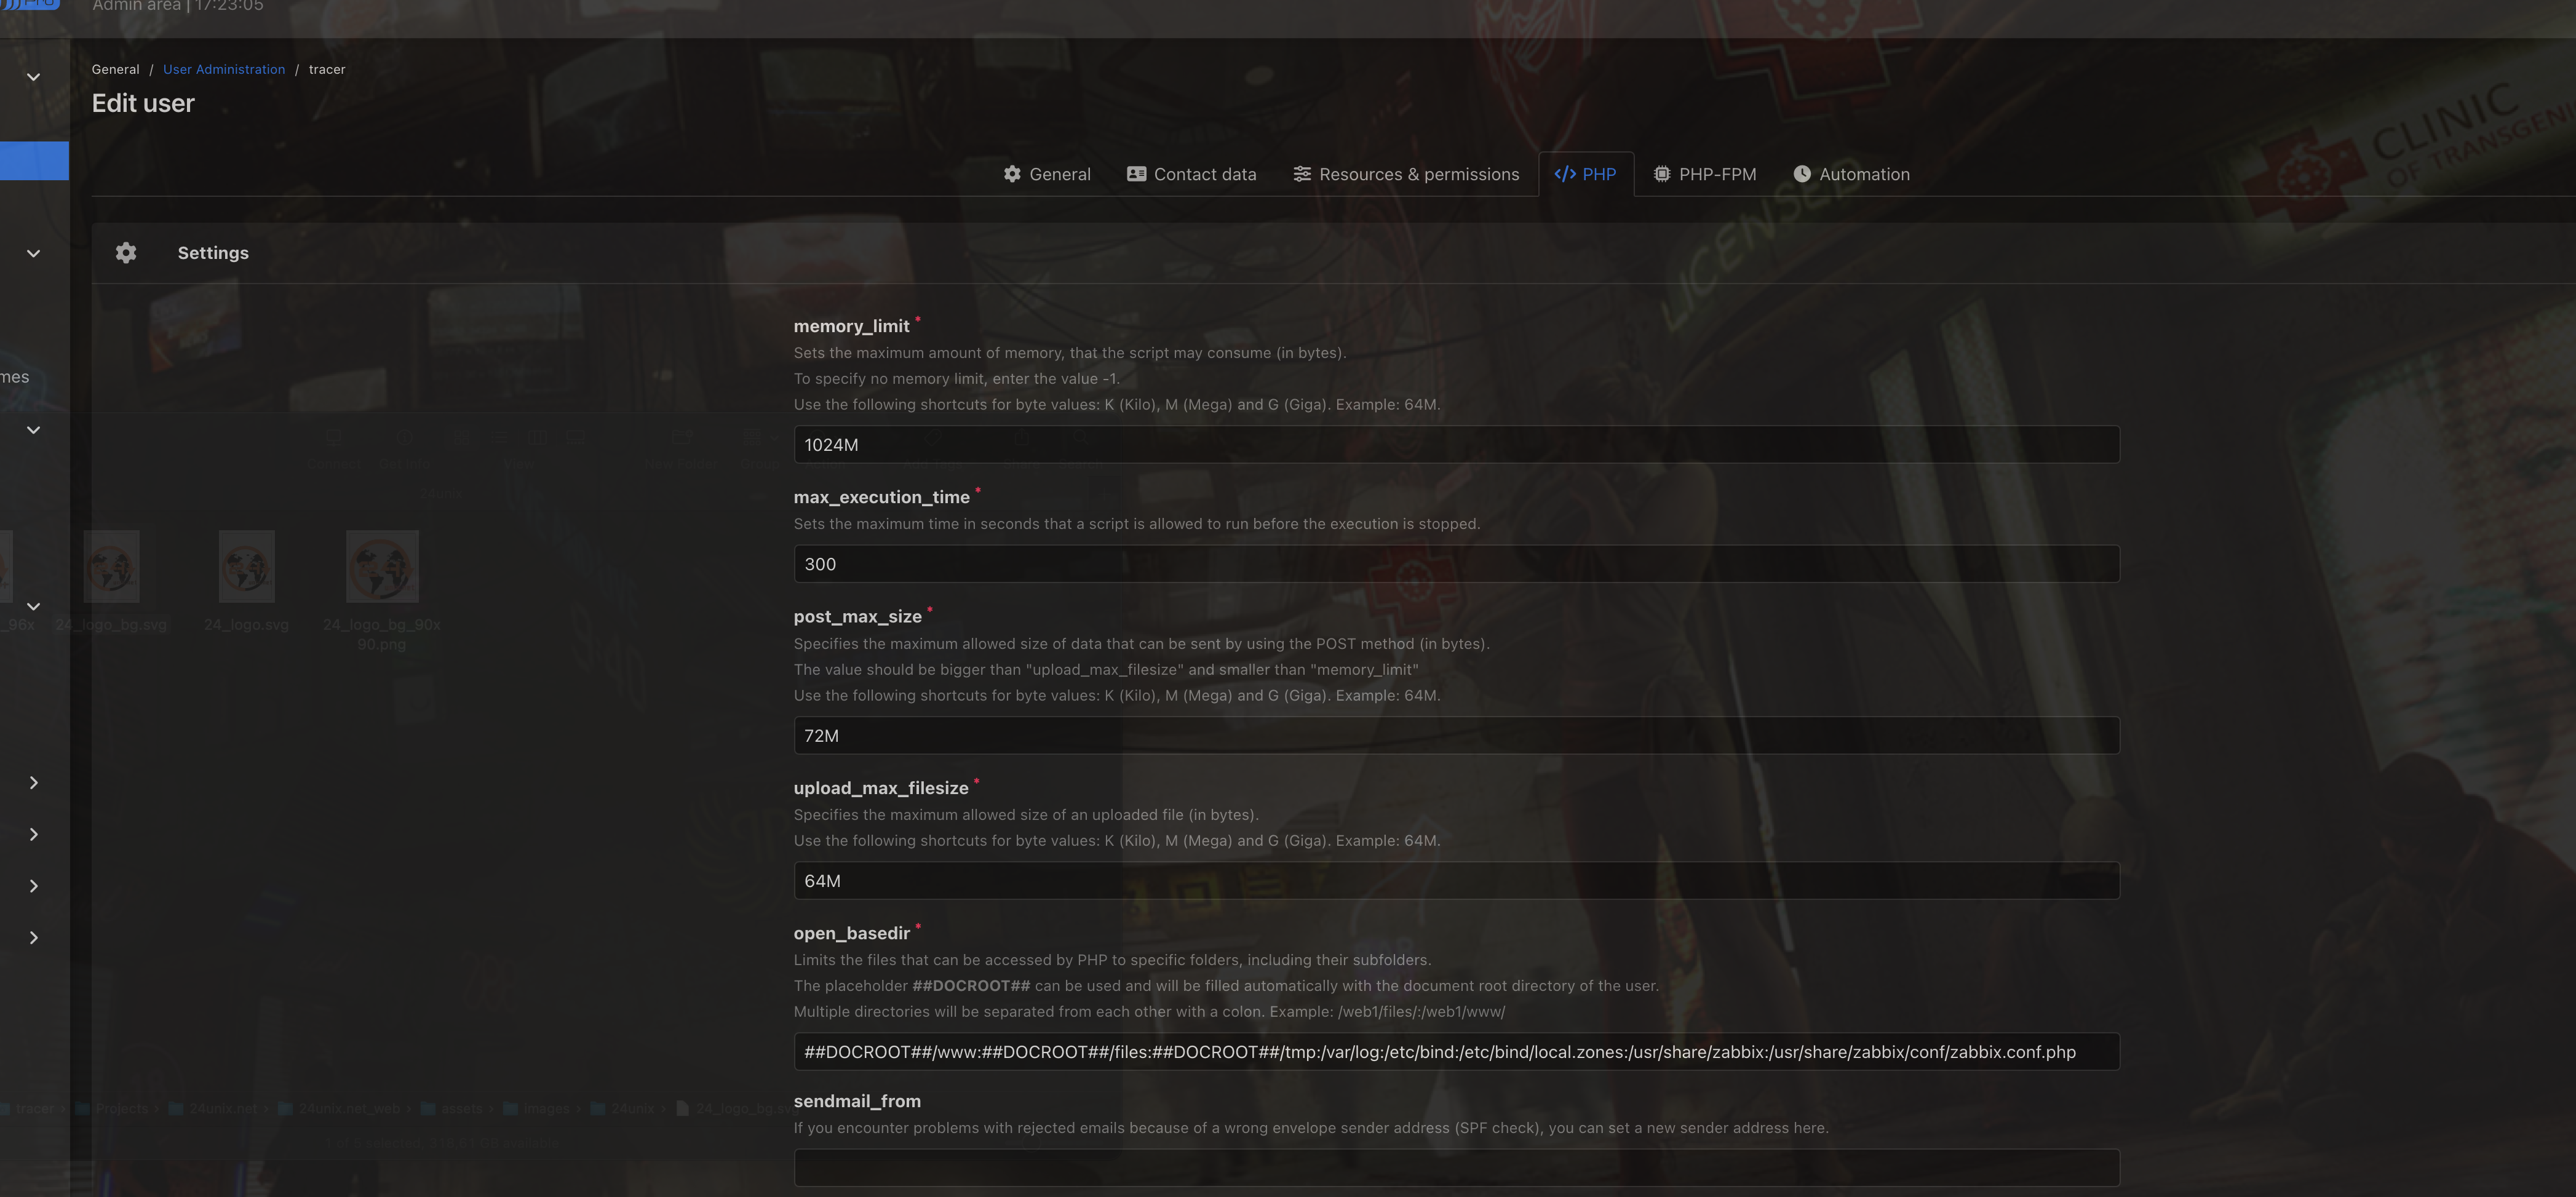
So now we can head back to our panel and set the Document root to /home/users/tfunix/ns1.24unix.net/bindAPI/public.
Additionally, we have to change the open_basedir directive:
##DOCROOT##/www:##DOCROOT##/files:##DOCROOT##/tmp:/etc/bind:/etc/bind/local.zones
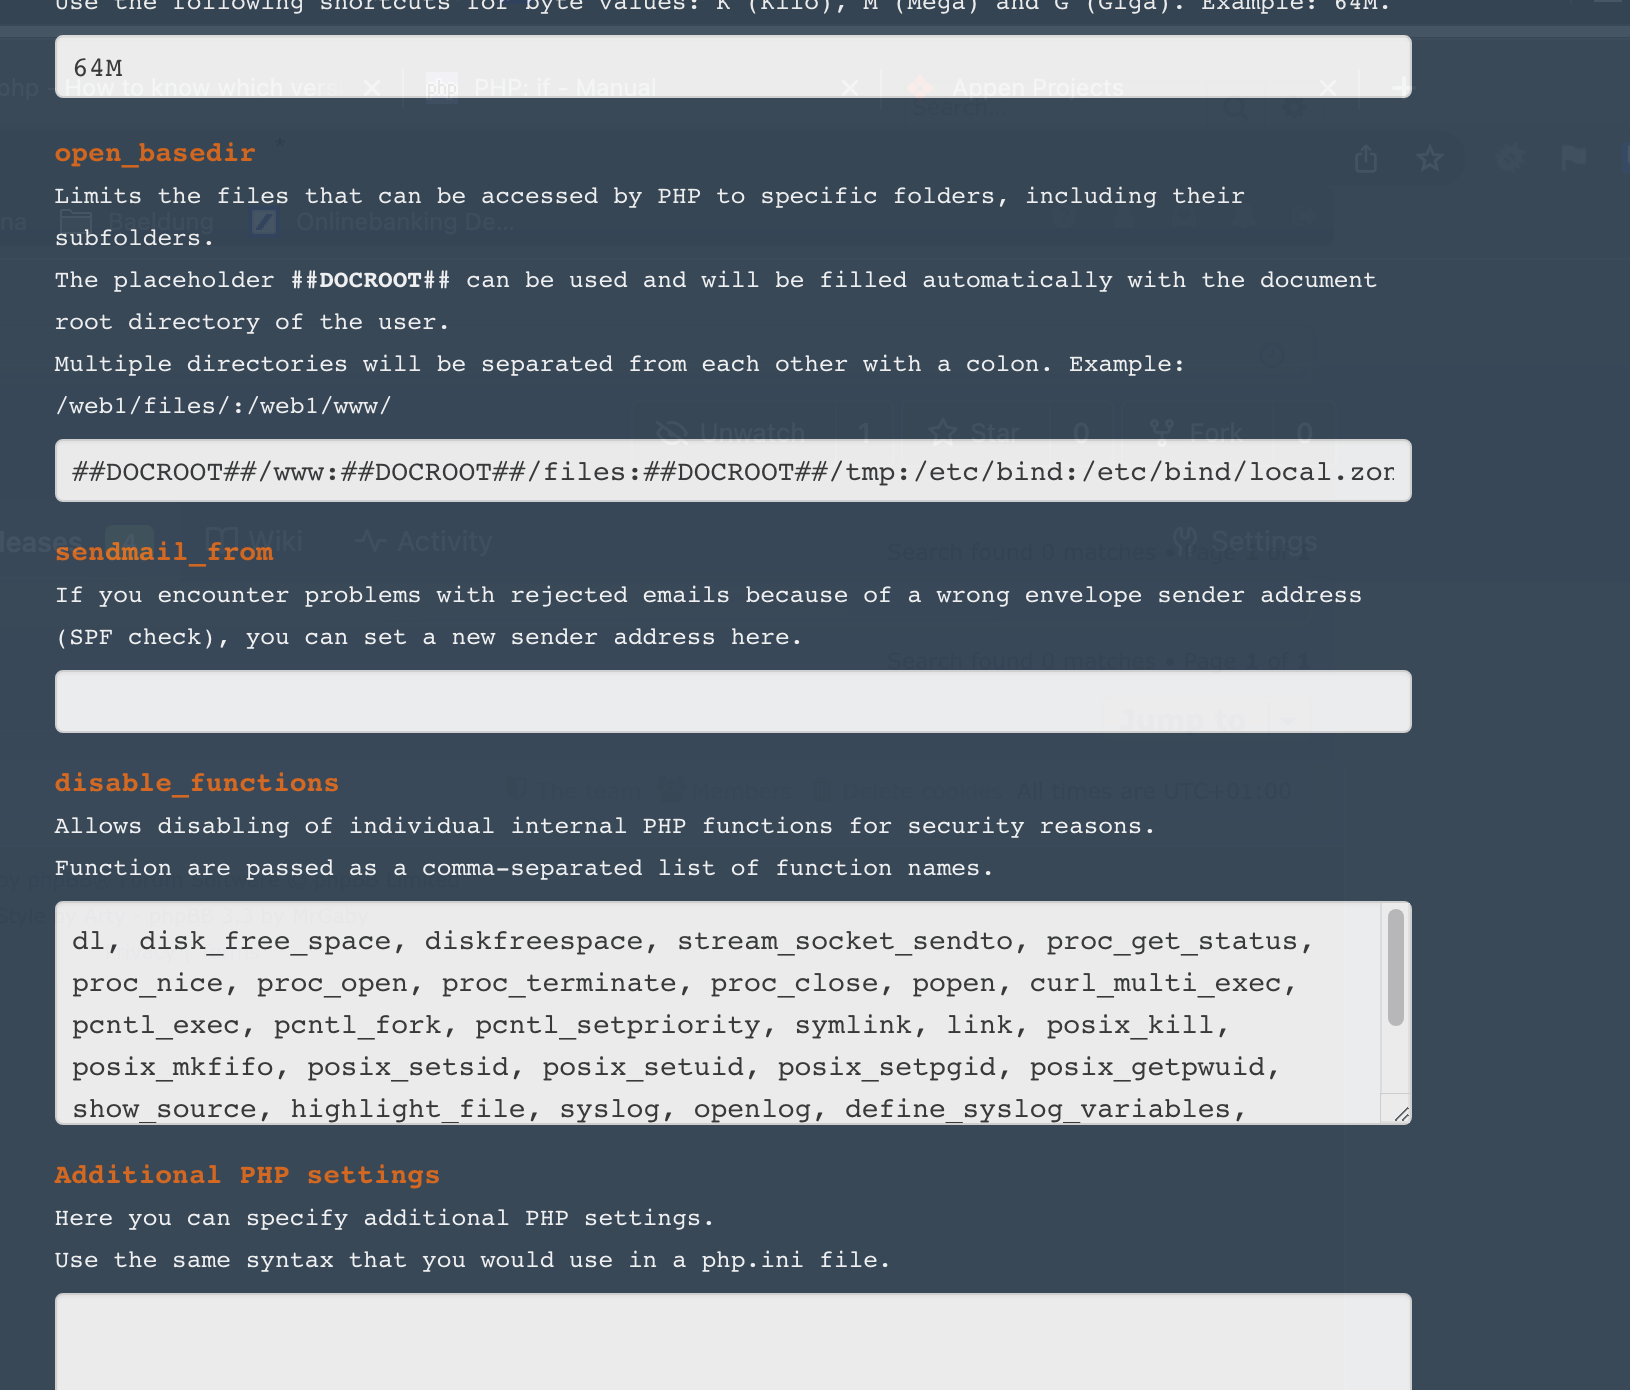
and remove exec from disabled functions.
OK, we are finished with the installation and head over to the 4. Configuration.
3.2. Installation on a plain Debian Bullseye
So, at first you should read and understand all steps in 3.1, as we will learn only the differences.
We assume that you're on a fresh minimal installation.
You need at first to pull some essentials:
apt install git vim wget zsh
To get access to all flavors of PHP sury.org is the perfect match, he's also the official maintainer für the Debian PHP packages (and Ubuntu, as anyone would care).
Execute this commands:
wget -O /etc/apt/trusted.gpg.d/php.gpg https://packages.sury.org/php/apt.gpg
echo "deb https://packages.sury.org/php/ $(lsb_release -sc) main" > /etc/apt/sources.list.d/php.list
apt update
We need at least php-fpm, php-cli, and besides that php-curl, php-xml and php-mbstring:
apt install ph8.1-fpm, php8.1-cli php8.1-curl php8.1-xml php8.1-mbstring
So, to be compatible with KeyHelp, we create a symlink:
ln -s /usr/bin/php /usr/bin/keyhelp-php81
We also need MariaDB, the successor of MySQL.
(Maria is the second daughter of Michael Widenius, guess what, his first is named My.
So MySQL and MariaDB even makes more sense ^^)
apt install mysql
And, we need the webserver, of course:
apt install apache2 libapache-mod-fcgid php8.1-fpm
And enable fpm support:
a2econf php8.1-fpm
Disable the default site:
a2dissite 000*
<VirtualHost *:80>
ServerName ns1.24unix.net
ServerAdmin tracer@24unix.net
DocumentRoot /var/www/html
ErrorLog ${APACHE_LOG_DIR}/ns1.24unix.net/error.log
CustomLog ${APACHE_LOG_DIR}/ns1.24unix.net/access.log combined

	RewriteEngine on
	RewriteCond %{SERVER_NAME} =ns1.24unix.net
	RewriteRule ^ https://%{SERVER_NAME}%{REQUEST_URI} [END,NE,R=permanent]
</VirtualHost>
<IfModule mod_ssl.c>
<VirtualHost *:443>
	ServerName ns1.24unix.net
	ServerAdmin tracer@24unix.net
        Protocols h2 h2c http/1.1
	DocumentRoot /var/www/html/bindAPI/public
	ErrorLog ${APACHE_LOG_DIR}/ns1.24unix.net/error.log
	CustomLog ${APACHE_LOG_DIR}/ns1.24unix.net/access.log combined
	SSLCertificateFile /etc/letsencrypt/live/ns1.24unix.net/fullchain.pem
	SSLCertificateKeyFile /etc/letsencrypt/live/ns1.24unix.net/privkey.pem
	Include /etc/letsencrypt/options-ssl-apache.conf
	<FilesMatch \.php$>
                SetHandler "proxy:unix:/run/php/php8.1-fpm.sock|fcgi://localhost"
        </FilesMatch>
	<Directory /var/www/html/bindAPI/public>
		Options -Indexes +FollowSymLinks +MultiViews
		AllowOverride All
		Require all granted
	</Directory>

</VirtualHost>
</IfModule>
php installer --install-dir=./bin/ TODO
/usr/bin/keyhelp-php81 bin/composer.phar update
4. Configuration
So, another call of our binary, this time we agree to get a config written:
# ./bin/console
Missing config file
Should I create a new config based on config.json.sample? (y/N): y
Config file has been generated. Adjust it to your needs, then proceed to database setup.
So, what's in it?
cat config.json
{
  "dbHost": "localhost",
  "dbPort": 3306,
  "dbDatabase": "sampledb",
  "dbUser": "sampleuser",
  "dbPassword": "secret",
  "debug": false
}
We'll start the installer another time:
$ ./bin/console
SQLSTATE[HY000] [1698] Access denied for user 'sampleuser'@'localhost'
Did you create the database and adjust the config file?

You can create database an user via a panel or manually in mysql shell:
Created an initial password: T6BpmtNk
CREATE DATABASE bindAPI;
CREATE USER 'bindAPI'@'localhost' IDENTIFIED BY 'T6BpmtNk';
GRANT SELECT, INSERT, UPDATE, DELETE, CREATE, INDEX, DROP, ALTER, CREATE TEMPORARY TABLES, LOCK TABLES ON bindAPI.* TO 'bindAPI'@'localhost';
There is no need to run FLUSH PRIVILEGES when using GRANT!
So, now it offers us the SQL statements to create a new user and database and set permissions. If were on plain debian, we just can copy and paste (the password is random) this as root into mysql.
If we're using the panel, lets create a database and write down the credentials and update config.json.
And another call to the console:
$ ./bin/console
Error: Cannot find tables.
Should I try to create them? (y/N): y
Tables have been created.
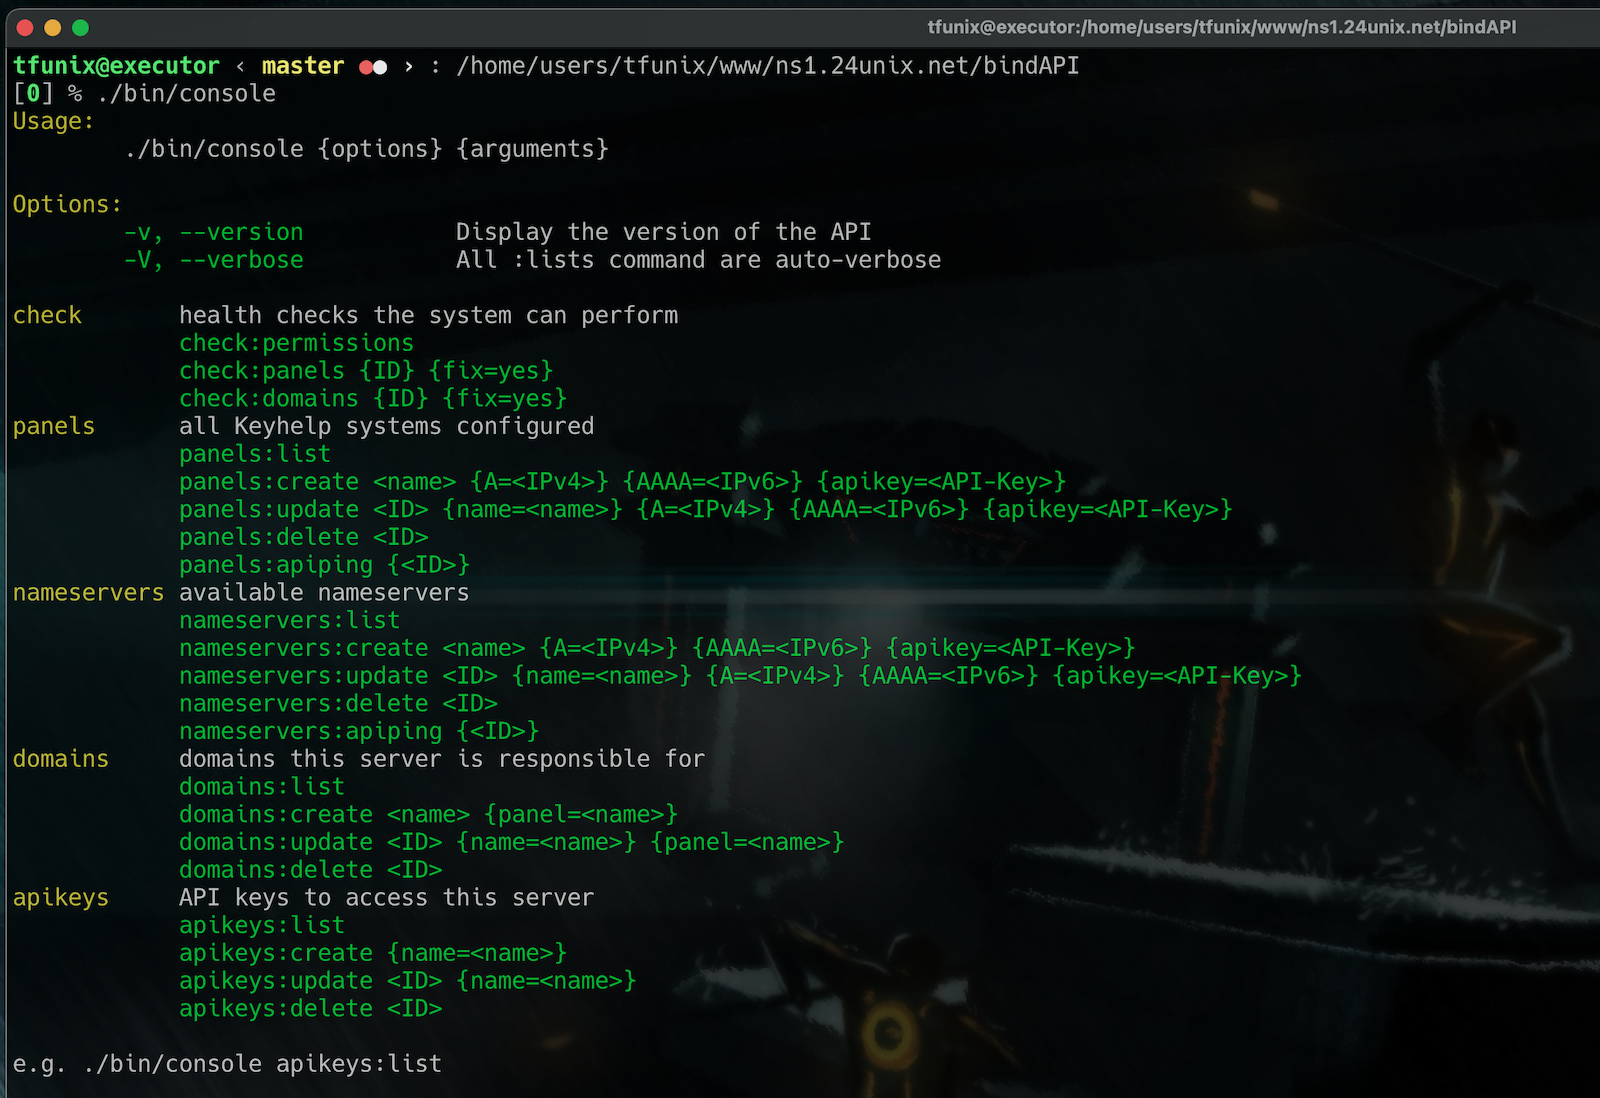
When we now call the console it displays its options:
Now we can finally begin to populate our configuration.
We assume ns1 and ns2 are already configured, so we add them to the local config:
$ ./bin/console nameservers:create ns1.24unix.net a=176.9.165.128 aaaa=2a01:4f8:161:12cd::128 apikey=61f27a57c9d1f.[truncated]
Nameserver ns1.24unix.net has been created with id 1
And the same procedure for ns2, and now we have:
$ ./bin/console nameservers:list
All available nameservers:
+------+------------------+------------------+---------------------------------------+-----------------+
|  ID  |  Name            |  A               |  AAAA                                 |  API Key        |
+------+------------------+------------------+---------------------------------------+-----------------+
|  1   |  ns1.24unix.net  |  176.9.165.128   |  2a01:4f8:161:12cd::128               |  61f27a57c9d1f  |
|  2   |  ns2.24unix.net  |  37.120.185.117  |  2a03:4000:f:5e2:a80c:2dff:fed1:e109  |  61eef211dea9a  |
+------+------------------+------------------+---------------------------------------+-----------------+
Now we can ping the API to check if our servers are alive.
We have to add --verbose to the command, because it can also be used to monitor the server in cron jobs where no output is desired, only the result code.
$ ./bin/console --verbose nameservers:apiping
ns1.24unix.net  176.9.165.128 pong              2a01:4f8:161:12cd::128 pong
ns2.24unix.net 37.120.185.117 pong 2a03:4000:f:5e2:a80c:2dff:fed1:e109 pong
Now we can add all our panels:
$ ./bin/console panels:create executor.24unix.net a=176.9.165.128 aaaa=2a01:4f8:161:12cd::128 apikey=Lo7jsXYQ.[truncated]
Panel executor.24unix.net has been created with id 28
Oups. The autoincrement ID should be 1, I'll fix that.
OK, now we've got all our panels:
$ ./bin/console panels:list
All available panels:
+------+--------------------------+------------------+---------------------------------------+------------+
|  ID  |  Name                    |  A               |  AAAA                                 |  API Key   |
+------+--------------------------+------------------+---------------------------------------+------------+
|  28  |  executor.24unix.net     |  176.9.165.128   |  2a01:4f8:161:12cd::128               |  Lo7jsXYQ  |
|  33  |  imperial.24unix.net     |  176.9.165.130   |  2a01:4f8:161:12cd::130               |  AFB0Gm7C  |
|  32  |  interdictor.24unix.net  |  176.9.165.131   |  2a01:4f8:161:12cd::131               |  qsrlTNIu  |
|  31  |  paz.24unix.net          |  176.9.165.134   |  2a01:4f8:161:12cd::134               |  DquWO8vf  |
|  29  |  shadow.24unix.net       |  37.120.185.117  |  2a03:4000:f:5e2:a80c:2dff:fed1:e109  |  o2CtvTQh  |
|  30  |  tector.24unix.net       |  176.9.165.137   |  2a01:4f8:161:12cd::137               |  HJwrfMd7  |
+------+--------------------------+------------------+---------------------------------------+------------+
Look if they're alive:
$ ./bin/console --verbose panels:apiping
executor.24unix.net     176.9.165.128 pong              2a01:4f8:161:12cd::128 pong
imperial.24unix.net     176.9.165.130 pong              2a01:4f8:161:12cd::130 pong
interdictor.24unix.net  176.9.165.131 pong              2a01:4f8:161:12cd::131 pong
paz.24unix.net          176.9.165.134 pong              2a01:4f8:161:12cd::134 pong
shadow.24unix.net      37.120.185.117 pong 2a03:4000:f:5e2:a80c:2dff:fed1:e109 pong
tector.24unix.net       176.9.165.137 pong              2a01:4f8:161:12cd::137 pong
OK, Nameservers ✅
Panels ✅
What's next? Check the domains on each panel:
$ ./bin/console --verbose check:panels fix=yes
check all …
Keyhelp-Panel: executor.24unix.net
Domain: 24unix.net ns1.24unix.net  OK ns2.24unix.net  OK
Keyhelp-Panel: imperial.24unix.net
Domain: rchelifan.org ns1.24unix.net  OK ns2.24unix.net  OK
Keyhelp-Panel: interdictor.24unix.net
No second level domains found.
Keyhelp-Panel: paz.24unix.net
Domain: crowddataworker.de ns1.24unix.net  OK ns2.24unix.net  OK
Domain: cdw.one            ns1.24unix.net  OK ns2.24unix.net  OK
Domain: aussempott.de      ns1.24unix.net  OK ns2.24unix.net  OK
Domain: fairdns.de         ns1.24unix.net  OK ns2.24unix.net  OK
Domain: tzazicke.de        ns1.24unix.net  OK ns2.24unix.net  OK
Keyhelp-Panel: shadow.24unix.net
No second level domains found.
Keyhelp-Panel: tector.24unix.net
No second level domains found.
The output is a bit ugly, maybe I'll come up with something nicer.
So, now we have our nameservers, our panels.
But only two of them, ns3 is missing, so we're going to add it.
We create a new key:
$ ./bin/console apikeys:create
API key 1 has been generated. Store it in a save place, it cannot be recovered.
	6213acb116613.[truncated]
And add it to our list of nameservers:
$ ./bin/console nameservers:create ns3.24unix.net a=212.227.160.159 aaaa=2001:8d8:1801:701::1 apikey=6213acb116613.[truncated]
Nameserver ns3.24unix.net has been created with id 3
We can soon start filling our own list of slaves domains.
But before, we need to check some prerequisites:
$ ./bin/console  check:permissions
Checking permission:

UID:	5001
Name:	tfunix
Checking file: /etc/bind/local.zones
PHP Warning:  fileperms(): stat failed for /etc/bind/local.zones in /home/users/tfunix/www/ns3.24unix.net/bindAPI/src/Controller/DomainController.php on line 121
	❌Group needs write permission!
Checking /etc/bind/named.conf.local
	❌ /etc/bind/local.zones needs to be included in /etc/bind/named.conf.local .
Checking directory: /etc/bind/zones/
PHP Warning:  fileperms(): stat failed for /etc/bind/zones/ in /home/users/tfunix/www/ns3.24unix.net/bindAPI/src/Controller/DomainController.php on line 140
	❌Group needs write permission!
So, there are a few manual steps needed.
tfunix has to be a group member of the „bind“ group. As root perform:
usermod -G bind tfunix
(Mind that it is a capital G, else you'll change the primary group and the checks will fail. Don't ask how I noticed …)
We now have to logout and login with tfunix for the changes to apply.
After new login it should look like this:
$ id
uid=5001(tfunix) gid=113(bind) groups=113(bind),1001(keyhelp_file_manager)
We again need root:
touch /etc/bind/local.zones
chown bind:bind /etc/bind/local.zones
echo 'include "/etc/bind/local.zones";' >> /etc/bind/named.conf.local

mkdir /etc/bind/zones
chown bind:bind /etc/bind/zones
chmod g+w /etc/bind/zones
Now it looks better:
$ ./bin/console check:permissions
Checking permission:

UID:	5001
Name:	tfunix
	✅ is in group 'bind
Checking file: /etc/bind/local.zones
	✅ Group has write access .
Checking /etc/bind/named.conf.local
	✅ /etc/bind/local.zones is included in /etc/bind/named.conf.local
Checking directory: /etc/bind/zones/
	✅ Group has write access .
Now, there is one manual step left, for now. We have to go to each panel and add an include file. BUT: This is a temporary workaround, a later version of Keyhelp will enable us to automate this step.
So, execute ./bin/console check:showincludes:
 ./bin/console check:showincludes
You need to add these lines to /etc/bind/local.bindapi.options and make sure
that include "/etc/bind/local.bindapi.options"; exists in /etc/bind/named.conf.options.

allow-transfer {
	176.9.165.128;
	2a01:4f8:161:12cd::128;
	37.120.185.117;
	2a03:4000:f:5e2:a80c:2dff:fed1:e109;
	212.227.160.159;
	2001:8d8:1801:701::1;
};
also-notify {
	176.9.165.128;
	2a01:4f8:161:12cd::128;
	37.120.185.117;
	2a03:4000:f:5e2:a80c:2dff:fed1:e109;
	212.227.160.159;
	2001:8d8:1801:701::1;
};

After the modification feel free to run named-checkconf to ensure there were no errors.
When all steps are prepared a first test:
$ ./bin/console check:panels 31
Keyhelp-Panel: paz.24unix.net
 Domain: crowddataworker.de ns1.24unix.net  OK ns2.24unix.net  OK ns3.24unix.net 404
 Domain: cdw.one            ns1.24unix.net  OK ns2.24unix.net  OK ns3.24unix.net 404
 Domain: aussempott.de      ns1.24unix.net  OK ns2.24unix.net  OK ns3.24unix.net 404
 Domain: fairdns.de         ns1.24unix.net  OK ns2.24unix.net  OK ns3.24unix.net 404
 Domain: tzazicke.de        ns1.24unix.net  OK ns2.24unix.net  OK ns3.24unix.net 404
Like expected, our new ns3 doesn't know any of the domains.
Now comes the fun part:
$ ./bin/console check:panels 31 fix=yes
Keyhelp-Panel: paz.24unix.net
 Domain: crowddataworker.de ns1.24unix.net  OK ns2.24unix.net  OK ns3.24unix.net 404 trying to fix …OK
 Domain: cdw.one            ns1.24unix.net  OK ns2.24unix.net  OK ns3.24unix.net 404 trying to fix …OK
 Domain: aussempott.de      ns1.24unix.net  OK ns2.24unix.net  OK ns3.24unix.net 404 trying to fix …OK
 Domain: fairdns.de         ns1.24unix.net  OK ns2.24unix.net  OK ns3.24unix.net 404 trying to fix …OK
 Domain: tzazicke.de        ns1.24unix.net  OK ns2.24unix.net  OK ns3.24unix.net 404 trying to fix …OK

tfunix@jarjar:/home/users/tfunix/www/ns3.24unix.net/bindAPI$ ./bin/console check:panels 31
Keyhelp-Panel: paz.24unix.net
 Domain: crowddataworker.de ns1.24unix.net  OK ns2.24unix.net  OK ns3.24unix.net  OK
 Domain: cdw.one            ns1.24unix.net  OK ns2.24unix.net  OK ns3.24unix.net  OK
 Domain: aussempott.de      ns1.24unix.net  OK ns2.24unix.net  OK ns3.24unix.net  OK
 Domain: fairdns.de         ns1.24unix.net  OK ns2.24unix.net  OK ns3.24unix.net  OK
 Domain: tzazicke.de        ns1.24unix.net  OK ns2.24unix.net  OK ns3.24unix.net  OK
Yes, all our domains from the given panel have been added to our nameserver.
Voila.
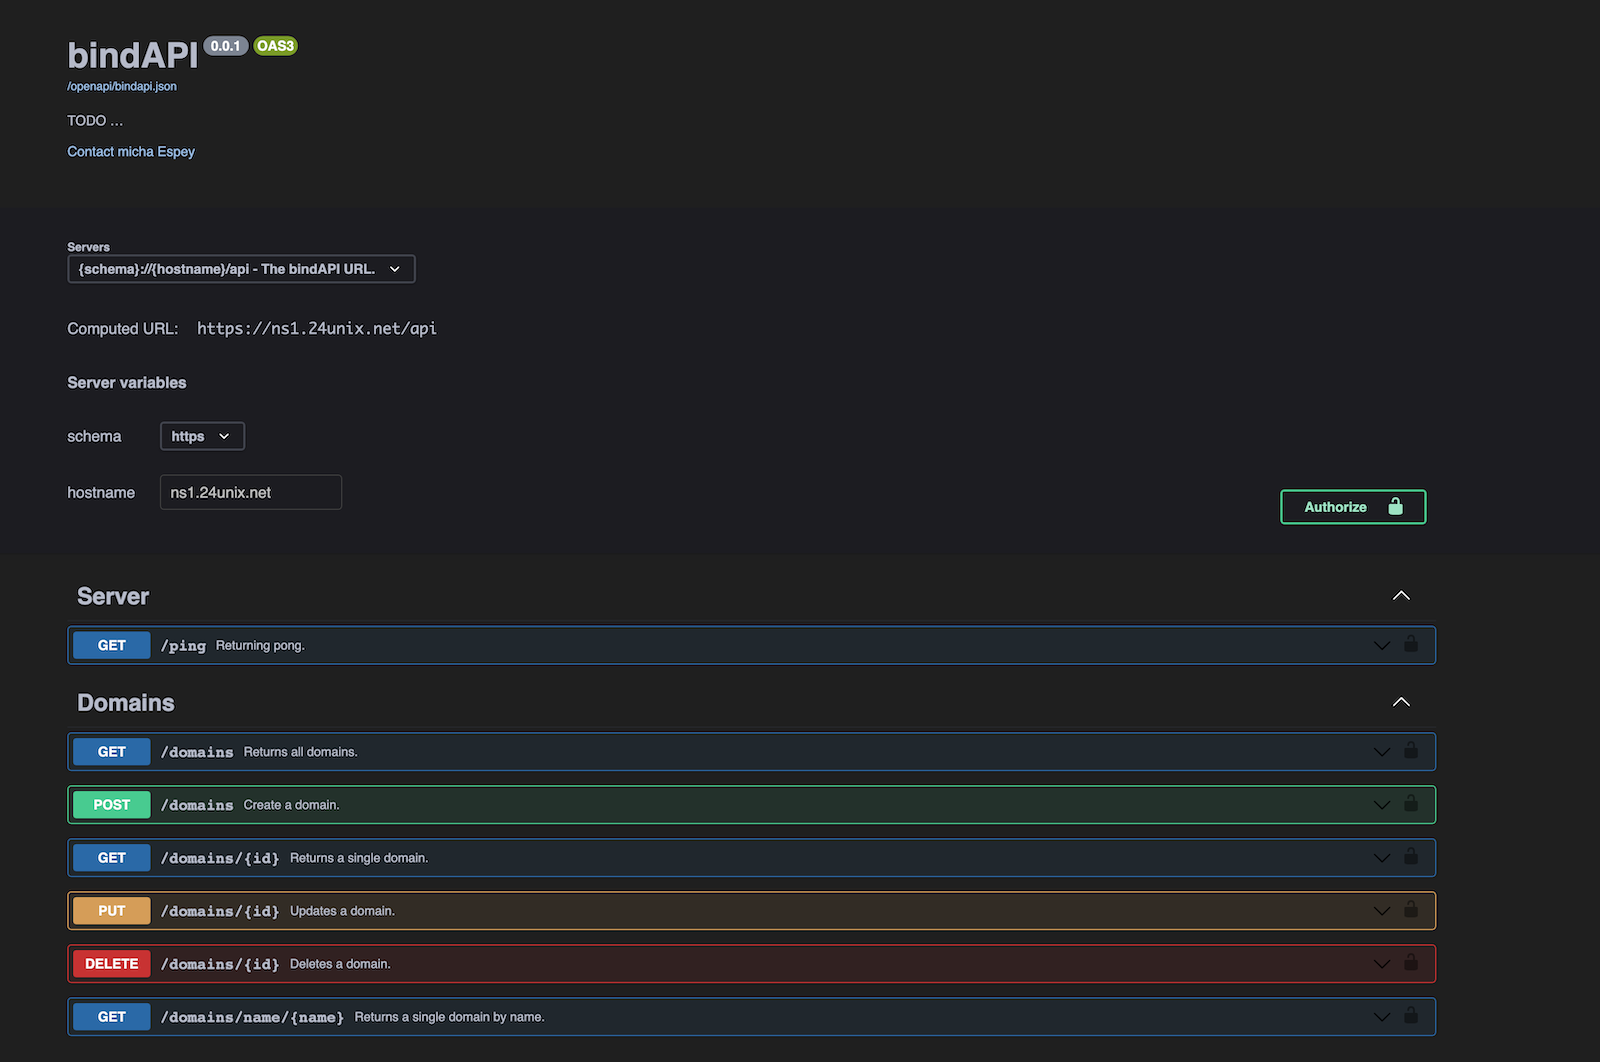
5. The API
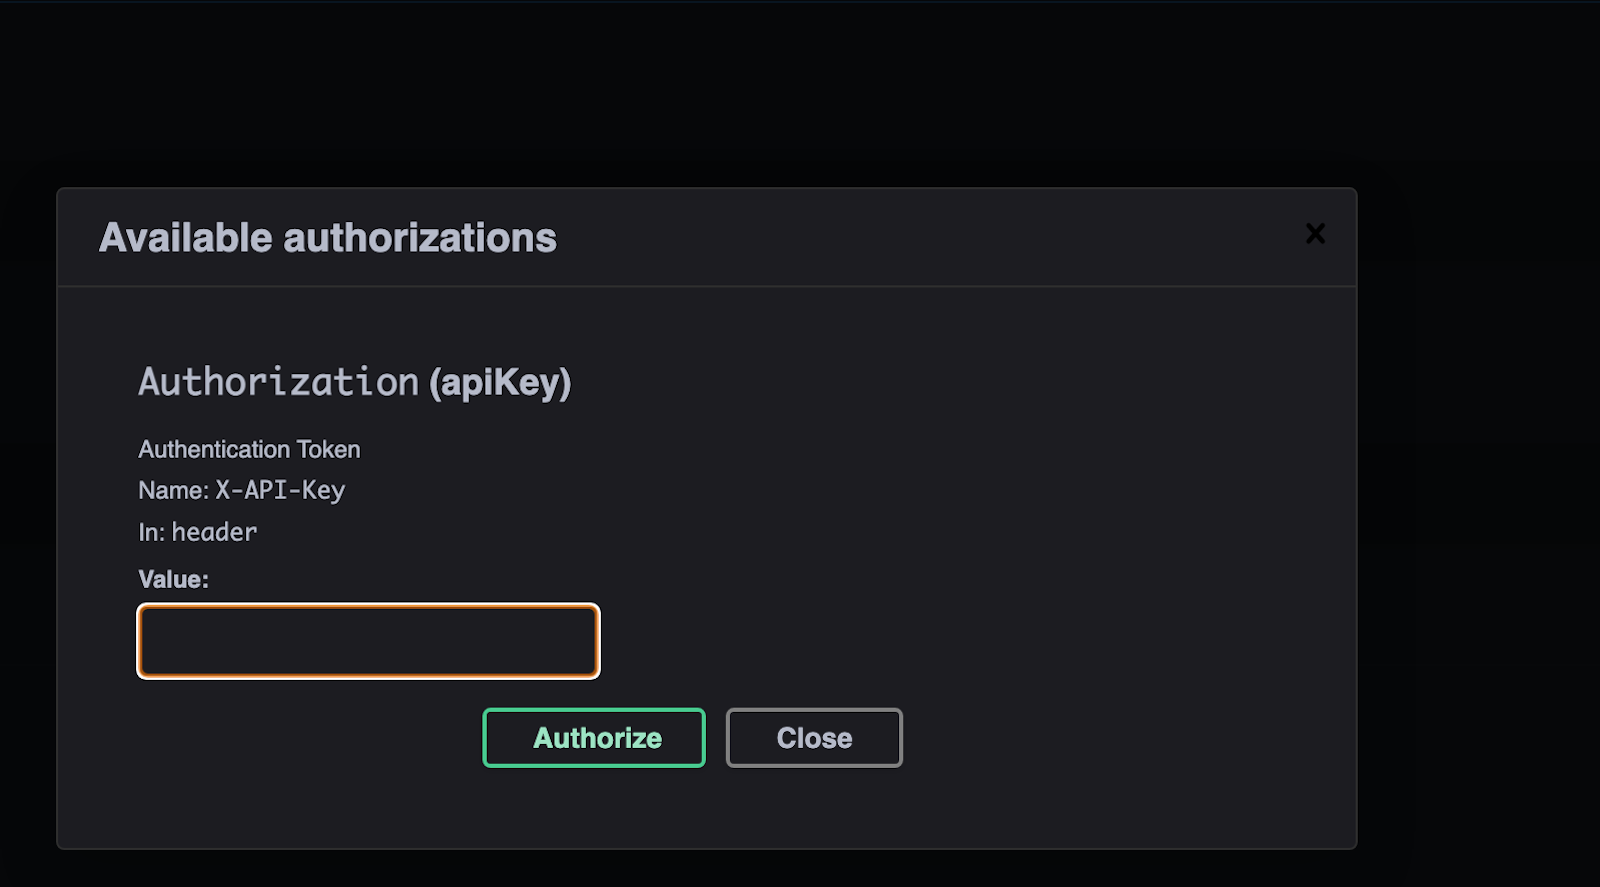
On the site you can authorize with an API key (creation of the key is described later in this document).

And enter you API key:
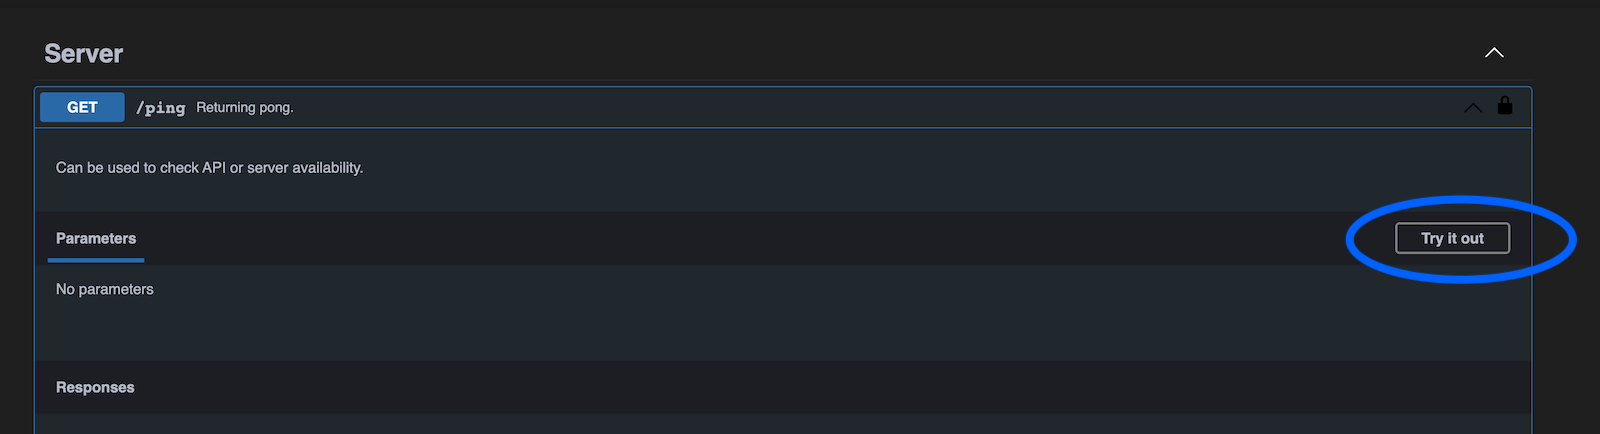
After successful authorization you can use the APi via the OpenAPI Interface, e.g. call the /ping endpoint to check if the API is alive.
You have to click on „Try it out“:
And then hit Execute:
Of course, you can issue the same command in your shell:
curl -X 'GET' \
'https://ns1.24unix.net/api/ping' \
-H 'accept: application/json' \
-H 'X-API-Key: 61f27a57c9d1f.[truncated]'
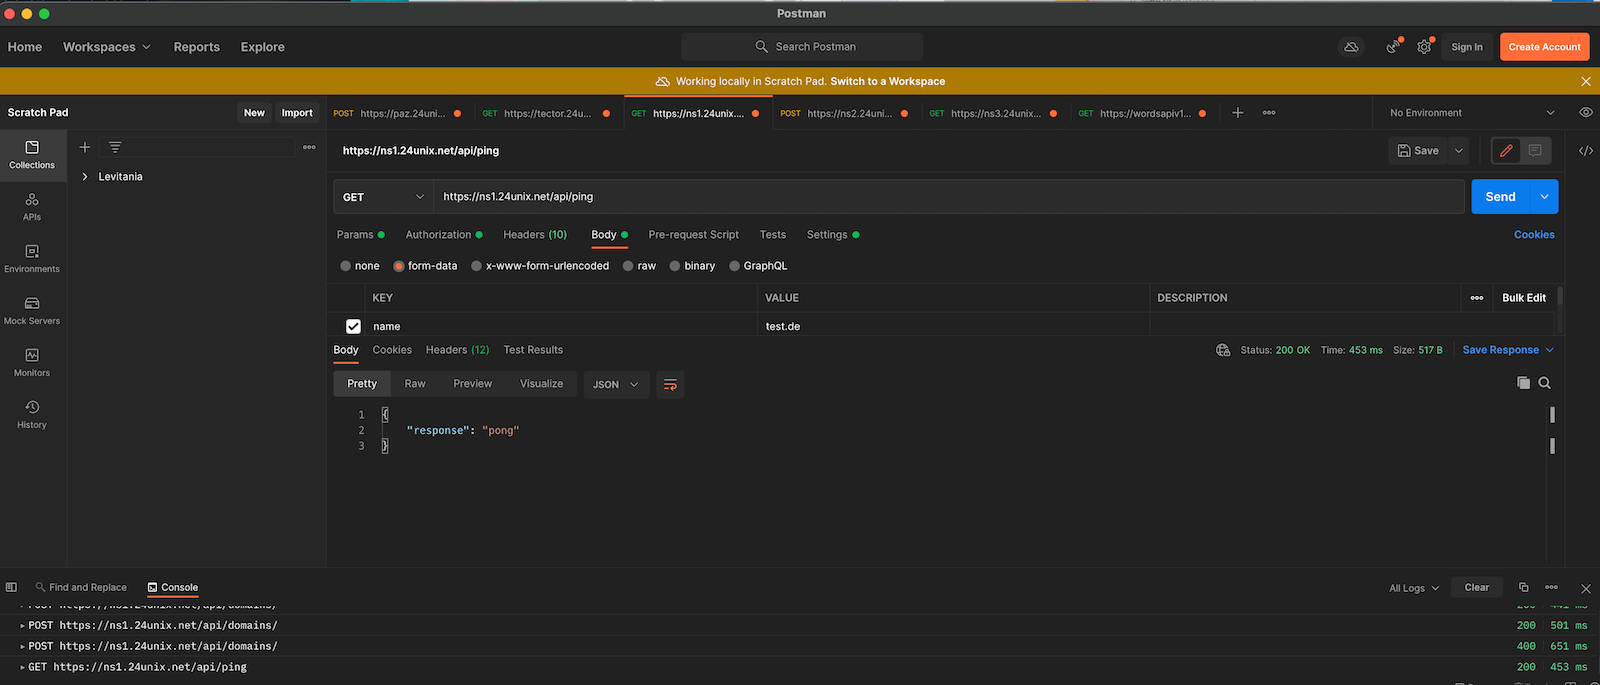
A helpful tool when dealing with API is Postman, if offers the same options as from the OpenAPI interface or via shell with curl.