329 lines
9.9 KiB
Markdown
329 lines
9.9 KiB
Markdown
1. [Overview](#1-overview)
|
|
2. [Features](#2-features)
|
|
3. [Installation](#3-installation)
|
|
4. [Configuration](#4-configuration)
|
|
5. [The API](#theapi)
|
|
6. [Conclusion](#conclusion)
|
|
|
|
<a name="overview"></a>
|
|
# 1. Overview
|
|
|
|
This package provides an API for the Bind nameserver.
|
|
It consists of two parts, the API itself and a CLI tool to configure the available functions.
|
|
|
|
|
|
<a name="features"></a>
|
|
# 2. Features
|
|
|
|
## 2.1. CLI
|
|
|
|
|
|
|
|
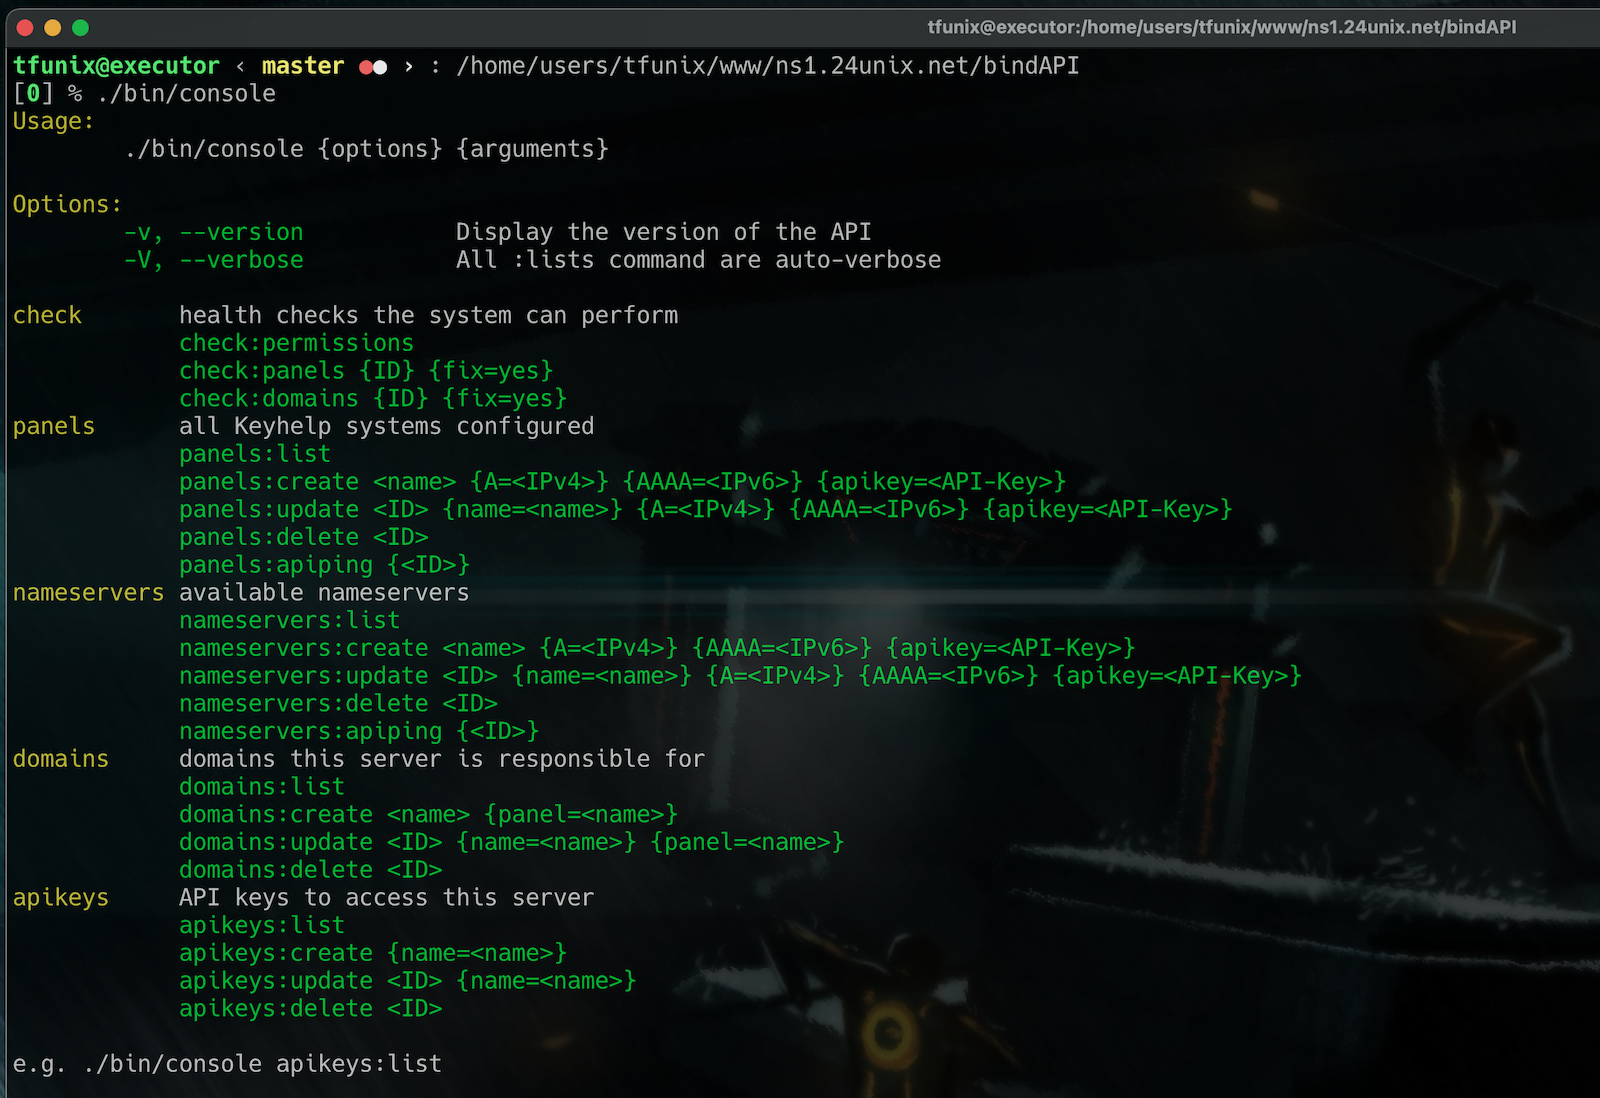
The CLI is used to perform configuration and some checks:
|
|
|
|
* check
|
|
- Permissions: The API needs to be able to access some files and create new ones
|
|
- Panels: This checks one or all panels if every nameserver is aware of all domains
|
|
- Domain: TODO
|
|
* panels
|
|
- List: List all panels which are configured on this server
|
|
- Create: Adds a new panel to the configuration
|
|
- Update: Changes one or more parameters of the panel
|
|
- Delete: Deletes the given panel
|
|
- ApiPing: Calls the /ping endpoint of the given server or all if no Panel is specified
|
|
- some additional API call might be added
|
|
* nameservers
|
|
- similar to panels, but for the nameservers
|
|
* domains
|
|
- similar usage to panels/domains, manage all slave zones
|
|
* apikeys
|
|
- manage the keys to access this nameserver via API
|
|
|
|
# 2.2. API
|
|
|
|
|
|
|
|
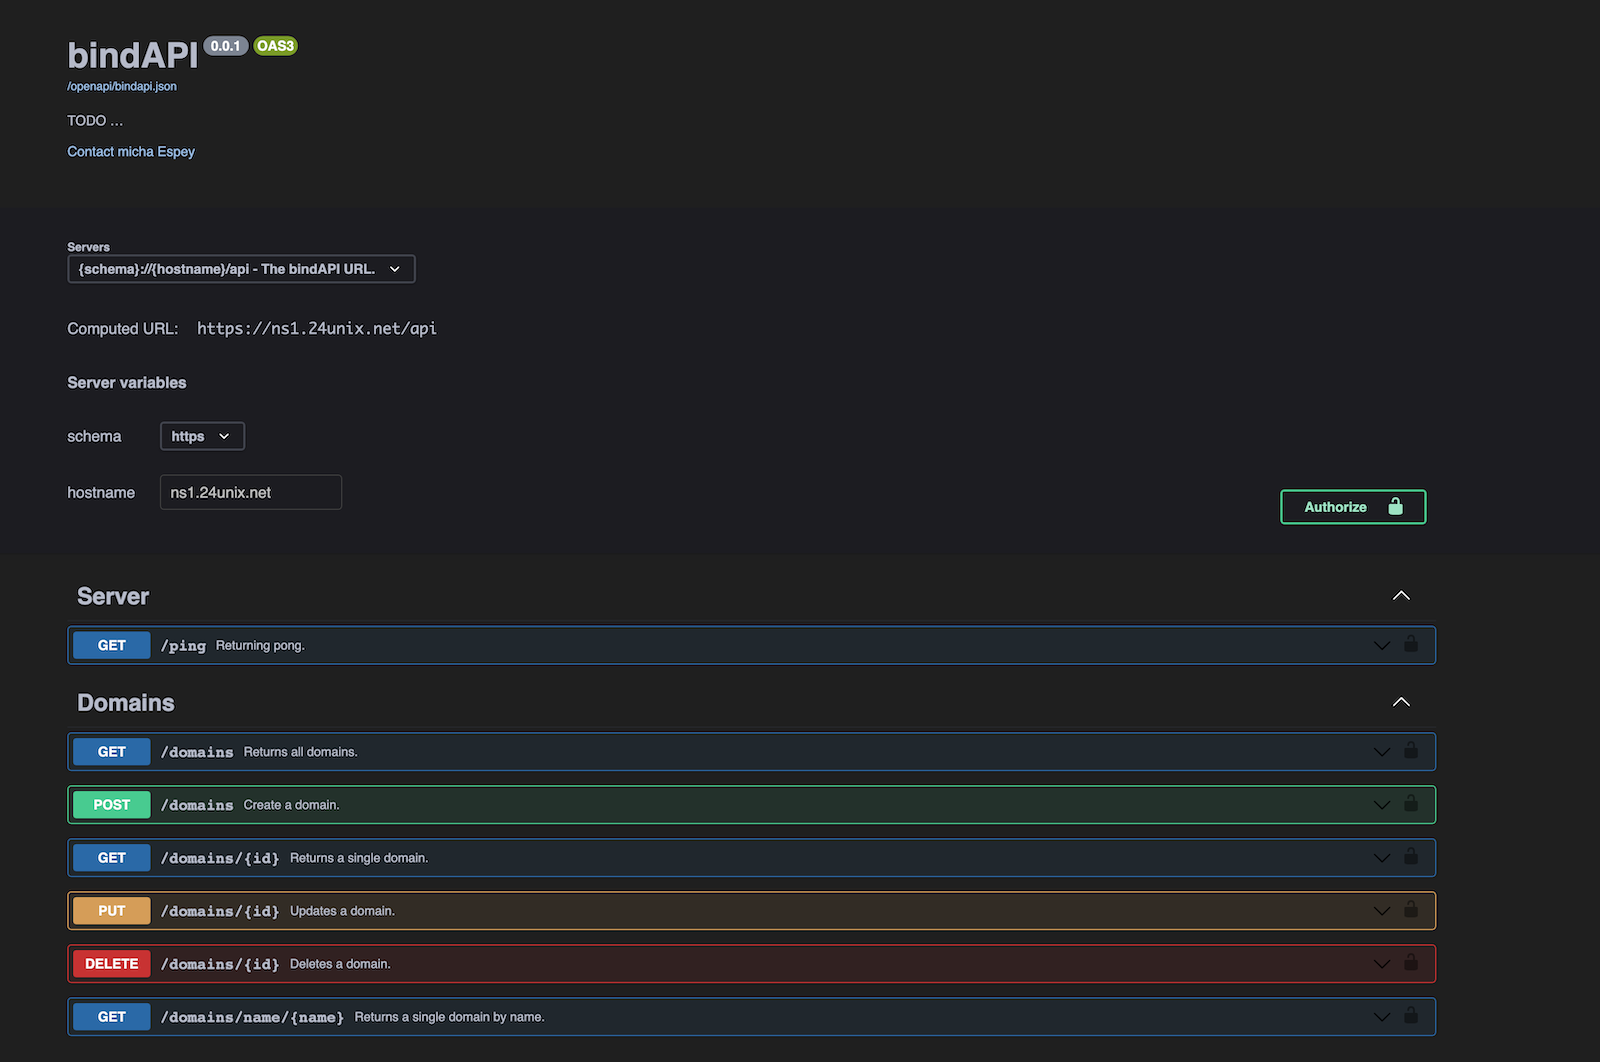
The APi is a RESTful API, there is a self explaining Swagger/OpenAPI available.
|
|
|
|
|
|
|
|
<a name="installation"></a>
|
|
# 3. Installation
|
|
|
|
You can install the bindAPi on either a standalone server or an existing KeyHelp Panel.
|
|
However, slave zones are only managed for masters which lie on Keyhelp panels.
|
|
|
|
## 3.1. Installation on a KeyHelp panel
|
|
|
|
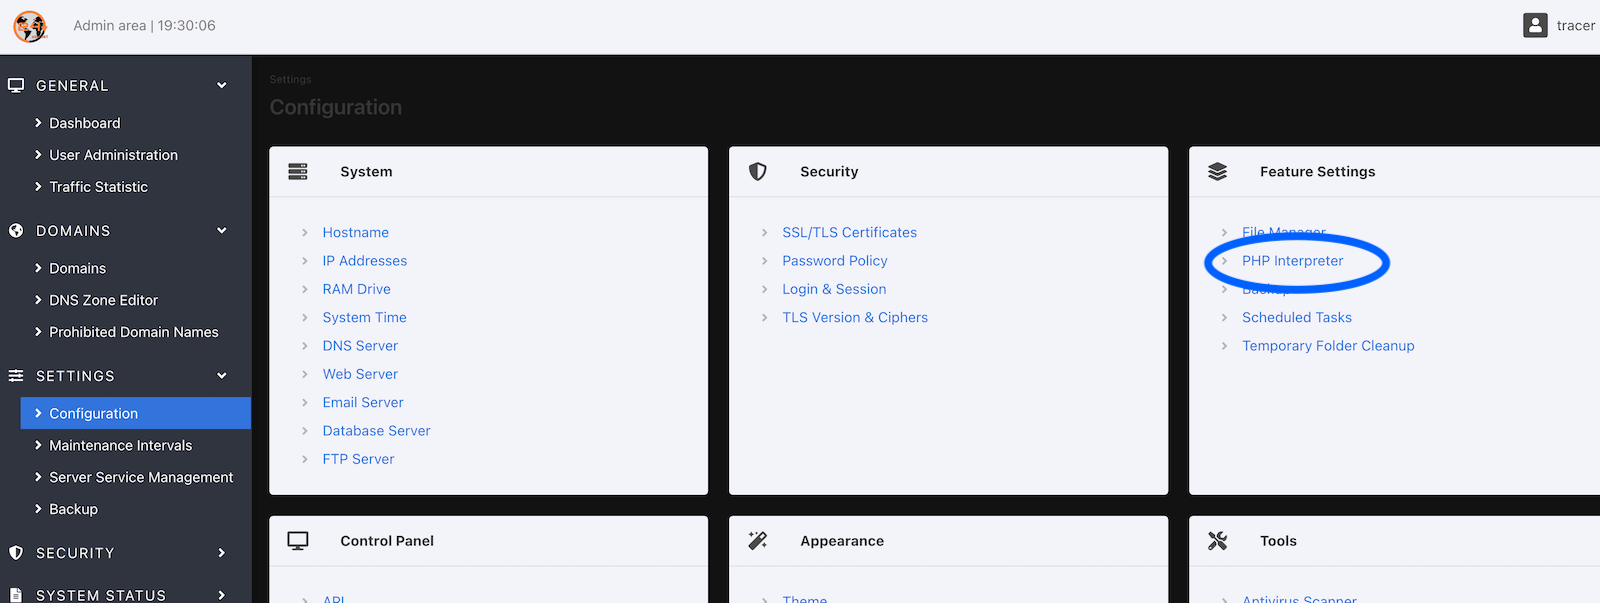
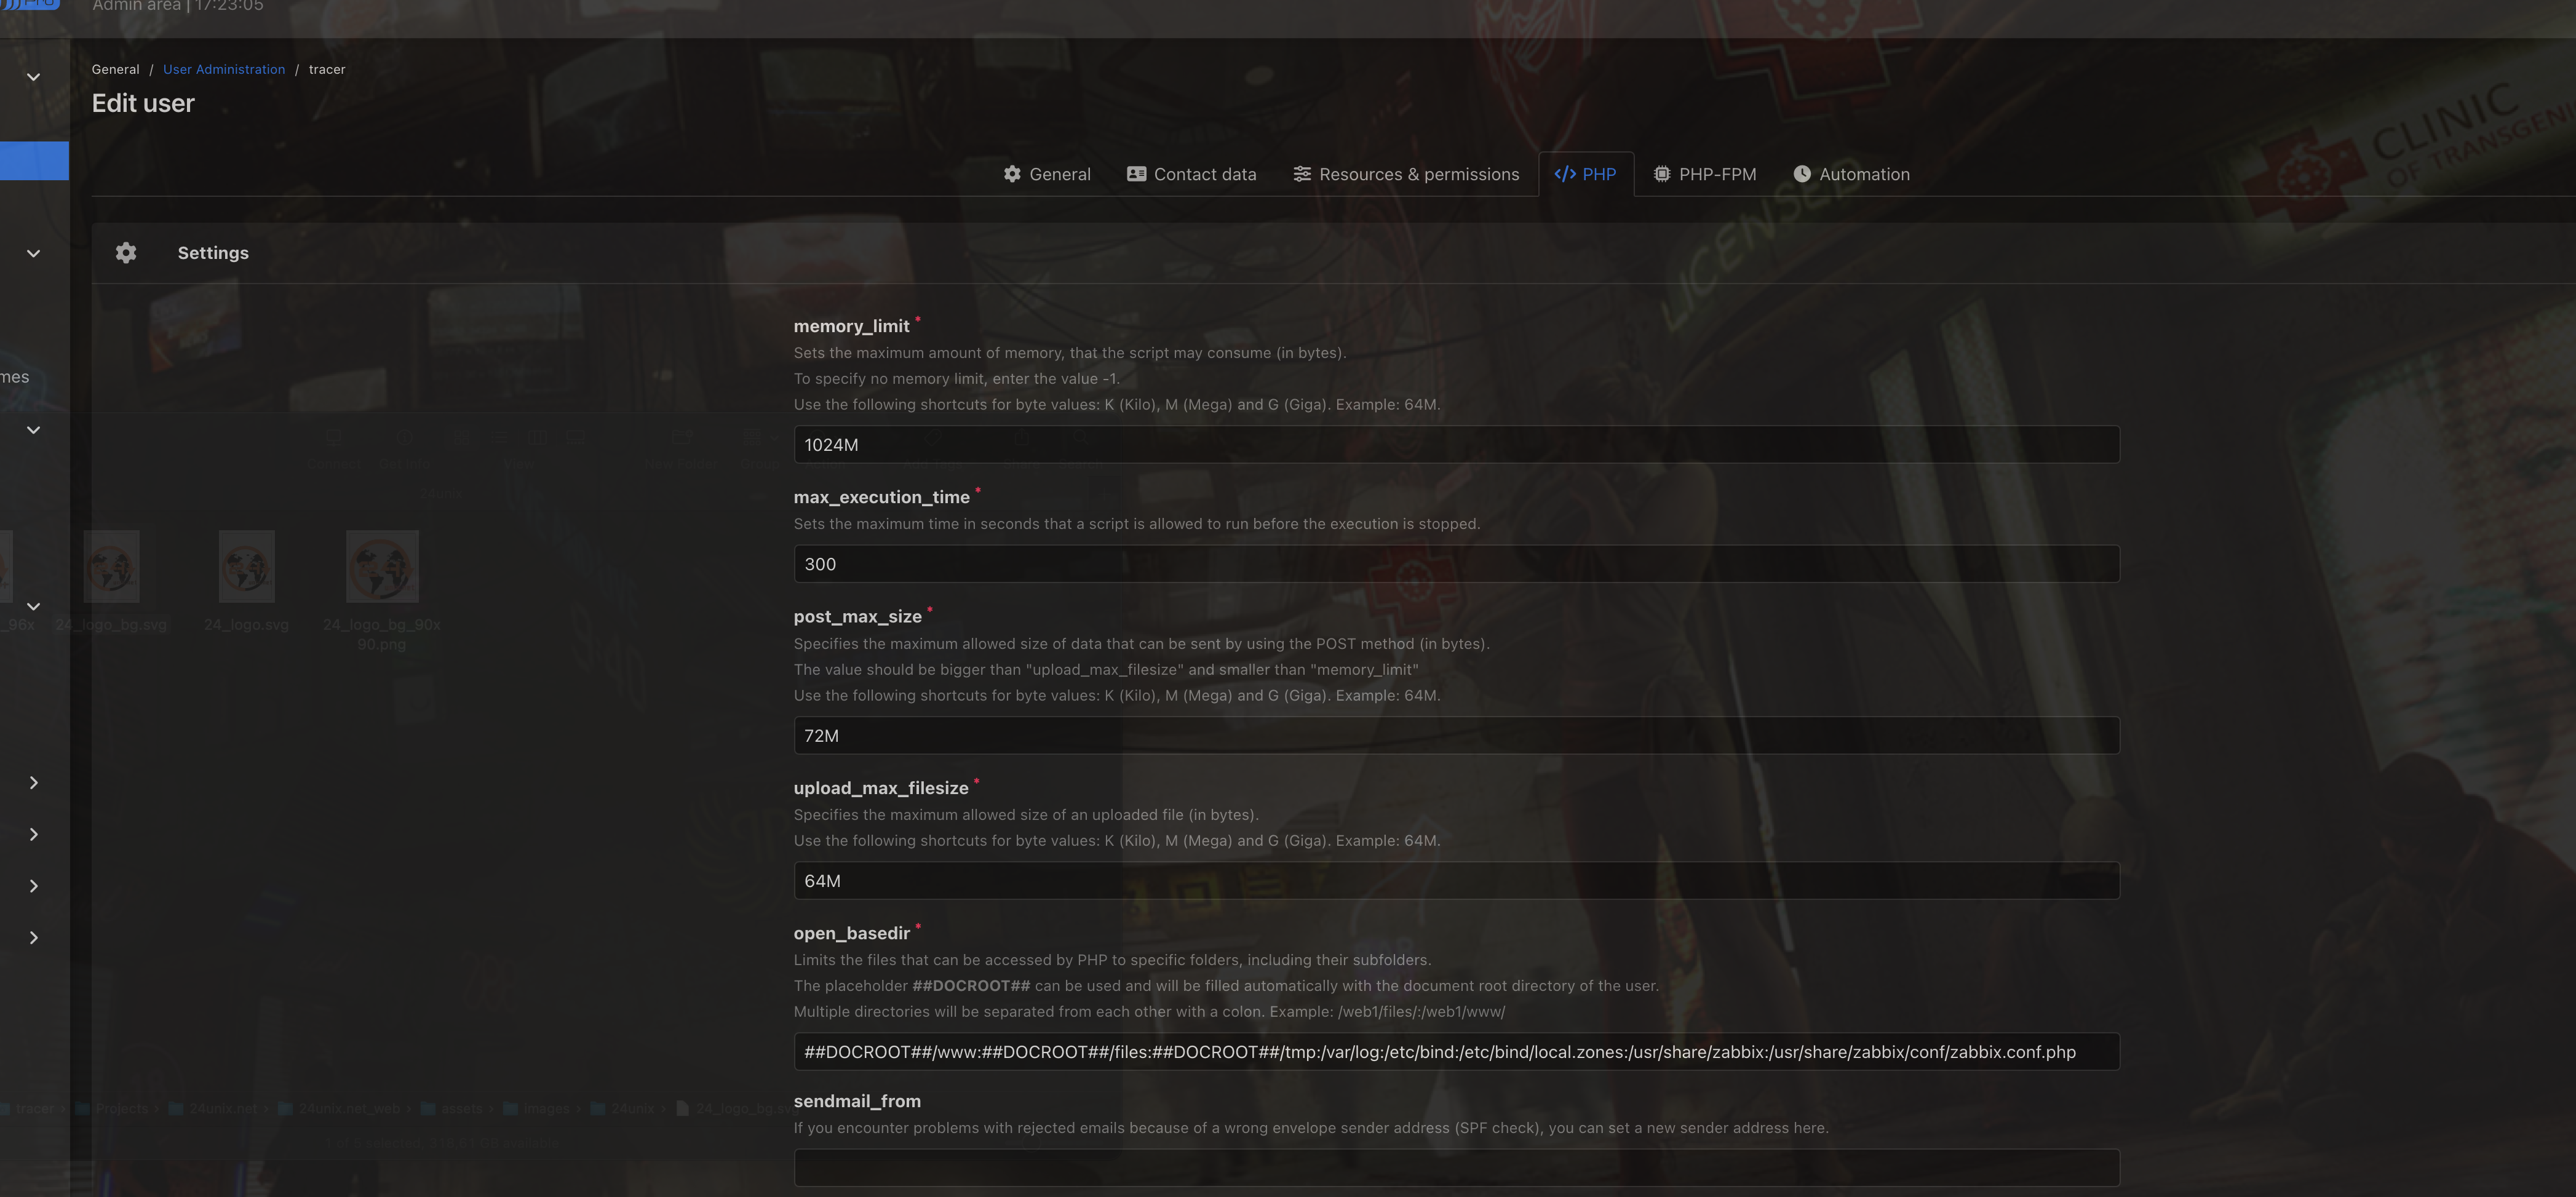
In KeyHelp, install PHP 8.1.
|
|
This is mandatory, the API relies on features only available since PHP 8.0.
|
|
It might run on PHP 8.0 but has not been tested as there is no reason not to install PHP 8.1.
|
|
|
|
So head over to:
|
|
Settings => Configuration => Feature Settings => PHP Interpreter
|
|
|
|
|
|
|
|
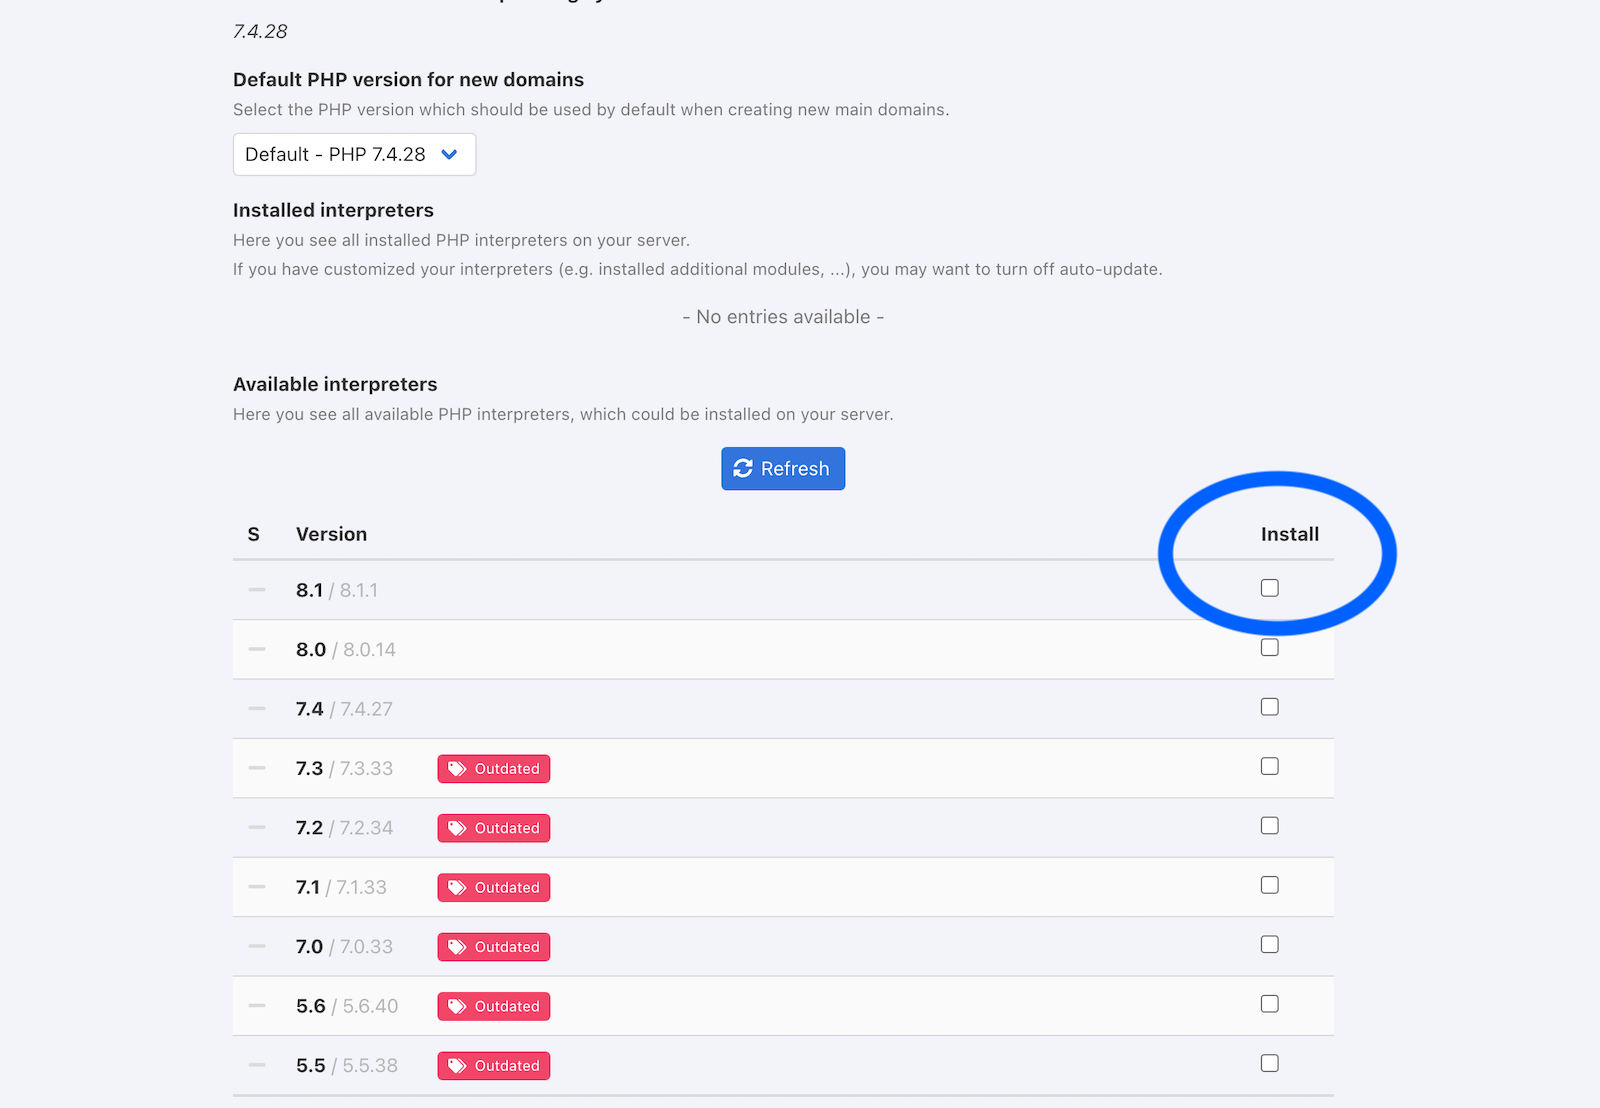
Set the checkmark and press Save.
|
|
|
|
Wait about a minute, the installation is started via a cronjob which runs every minute.
|
|
|
|
|
|
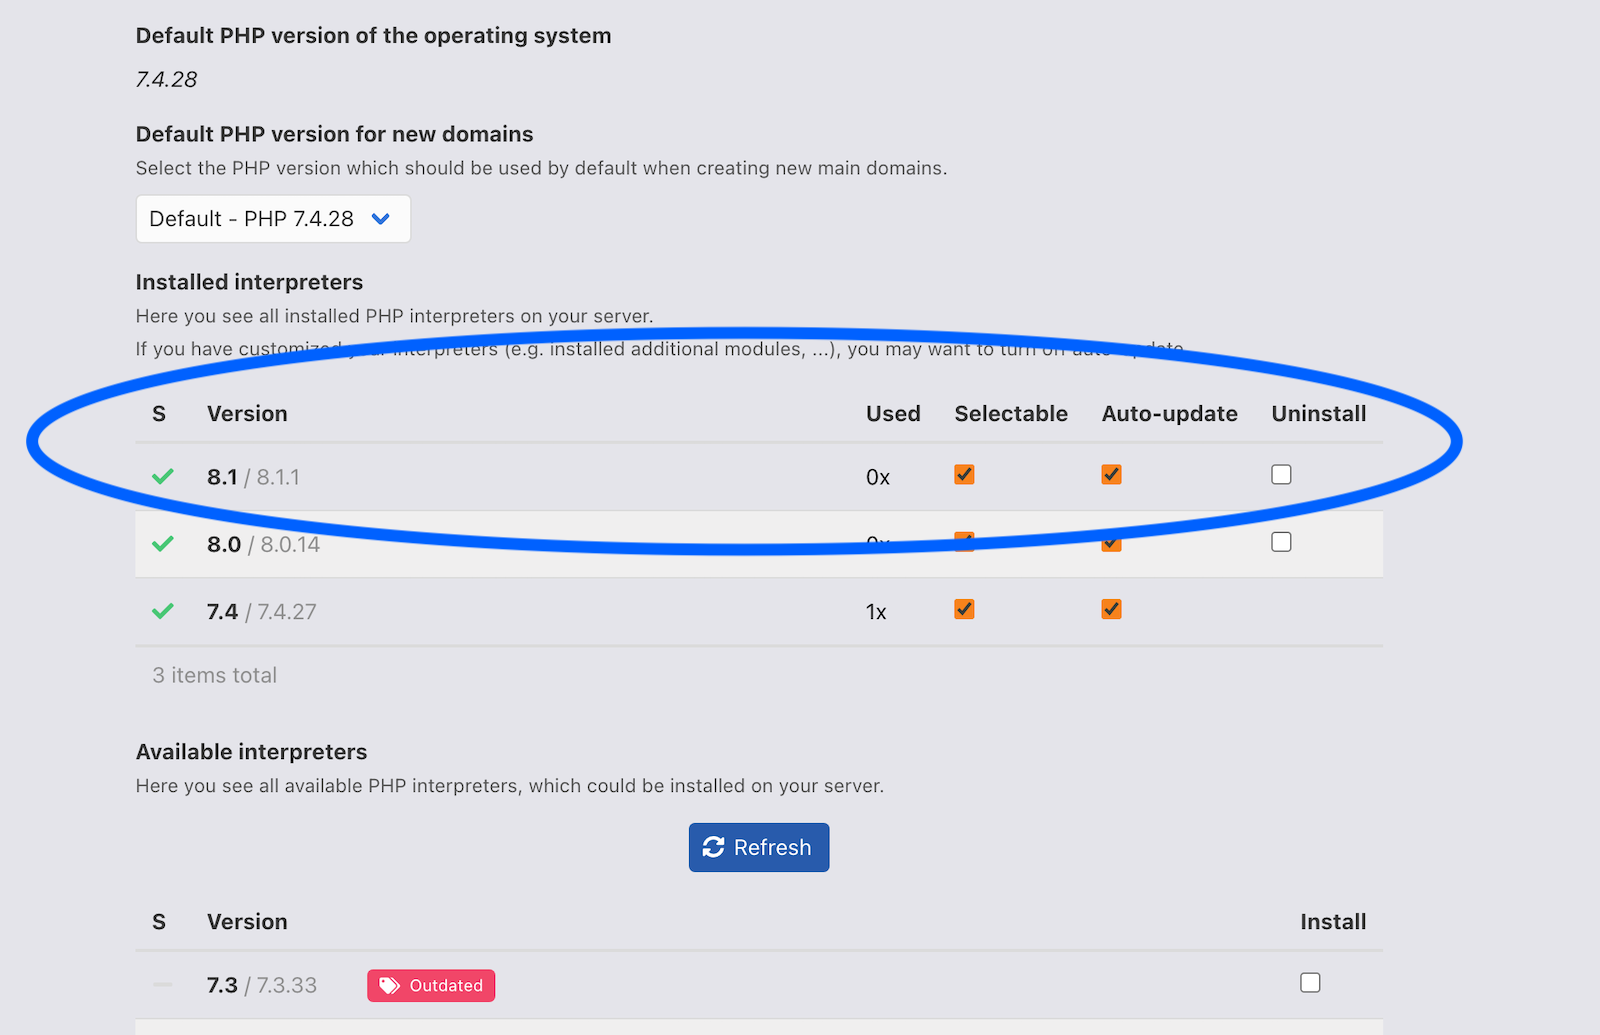
Now you see the newly installed PHP interpreters:
|
|
|
|
|
|
Next create a domain, e.g. ns1.24unix.net:
|
|
|
|

|
|
|
|
I created the domain in ns1.24unix.net below the /www folder.
|
|
|
|
We'll change the base directory later.
|
|
|
|
Now we need to log into our server, using e.g. iTerm2 or under Linux whichever Terminal you prefer.
|
|
|
|
As root (or via sudo):
|
|
|
|
`apt install git wget`
|
|
|
|
We need this to check out the bindAPi from git later.
|
|
|
|
So as we are still root, we need to install composer, two reasonable locations are under /bindAPI/bin or /usr/local/bin.
|
|
Here I will install it under /usr/local/bin, in the example with the standalone server I'll install it under /bindAPI/bin.
|
|
|
|
`wget https://getcomposer.org/installer`
|
|
|
|
`php composer-setup.php --install-dir=/usr/local/bin --filename=composer`
|
|
|
|
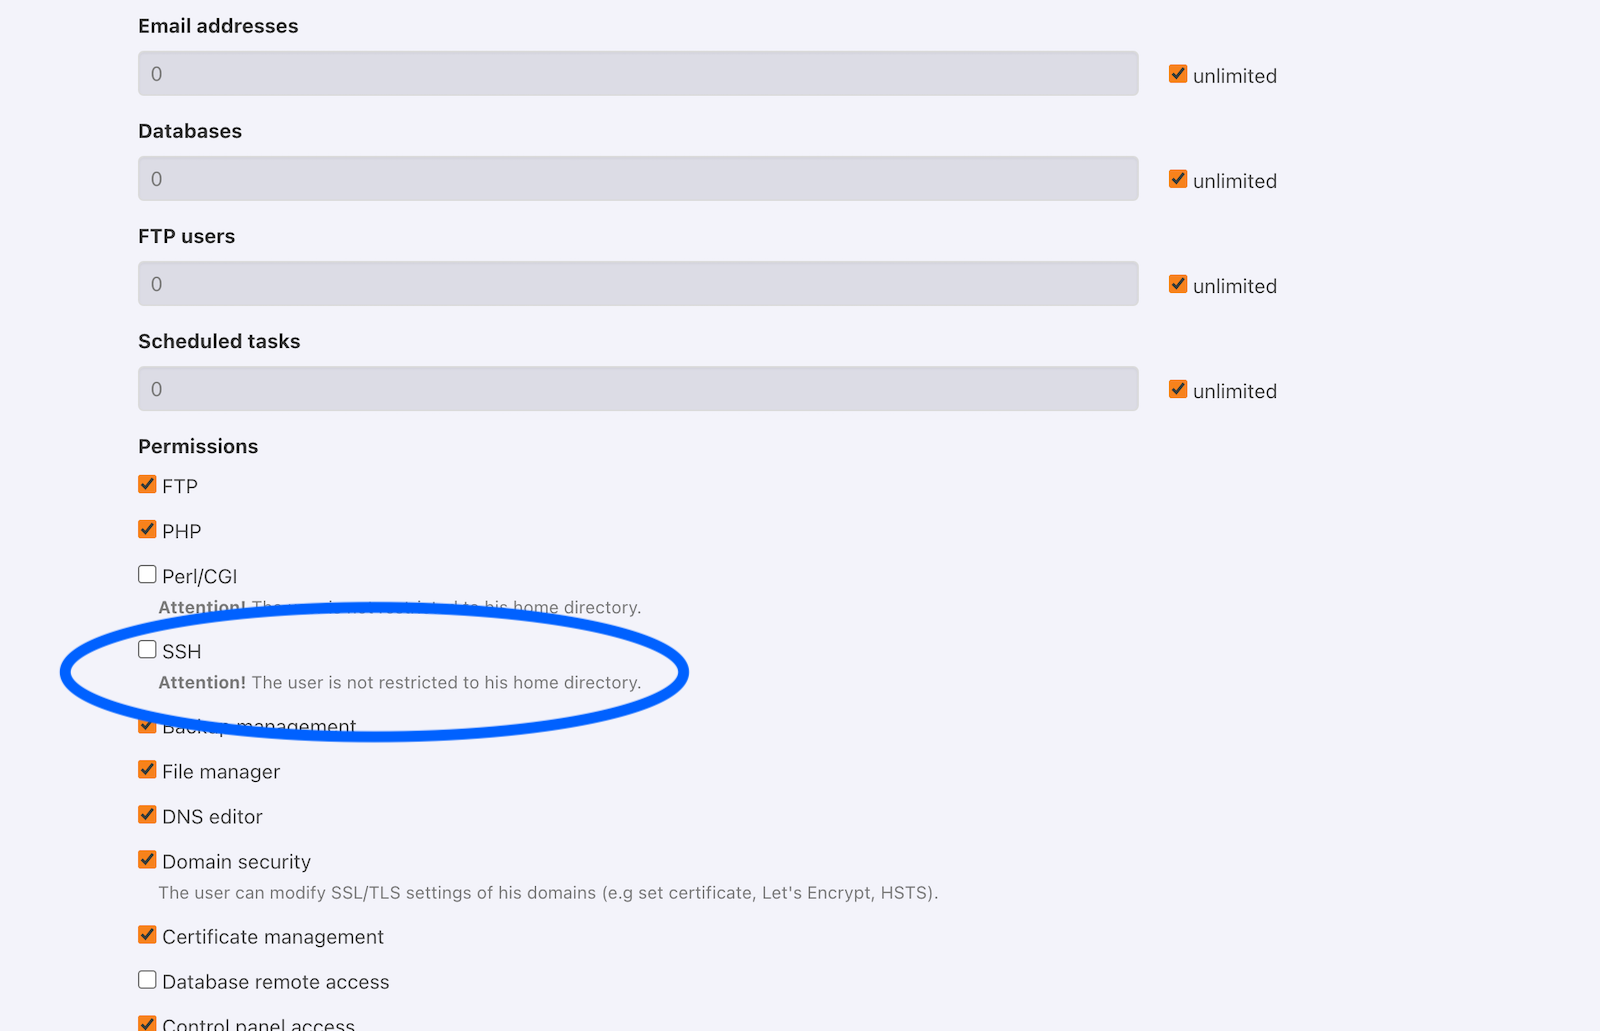
Now we can change into our new user, remind to give him shell access in the panel.
|
|
|
|
|
|
|
|
` su - tfunix`
|
|
|
|
|
|
In my example I assume the user is called tfunix, his home points to /home/users/tfunix.
|
|
|
|
Base directory for the bindAPI is ~/www/ns1.24unix.net/bindApi (~ => home folder).
|
|
|
|
So, we head over to our directory:
|
|
|
|
`cd www/ns1.24unix.net/bindAPI`
|
|
|
|
Remove the defaults files:
|
|
|
|
`rm *`
|
|
|
|
Next, we'll need to fetch the bindAPI (currently it has no release tag, that will change later)
|
|
|
|
```
|
|
git clone https://git.24unix.net/tracer/bindAPI.git
|
|
Cloning into 'bindAPI'...
|
|
remote: Enumerating objects: 878, done.
|
|
remote: Counting objects: 100% (878/878), done.
|
|
remote: Compressing objects: 100% (670/670), done.
|
|
remote: Total 878 (delta 510), reused 225 (delta 139), pack-reused 0
|
|
Receiving objects: 100% (878/878), 3.25 MiB | 4.46 MiB/s, done.
|
|
Resolving deltas: 100% (510/510), done.
|
|
```
|
|
|
|
We need to pill the dependencies for composer:
|
|
|
|
`/usr/bin/keyhelp-php81 /usr/local/bin/composer update`
|
|
|
|
You might notice a quite strange command.
|
|
We need to call php with full path, and explicitly the 8.1 version.
|
|
KeyHelp relies on the default PHP installation, so the php binary will always point to 7.4 when your on Debian Bullseye.
|
|
|
|
So, in bin/console the path to /usr/bin/keyhelp-php81 is hardcoded after the shebang, a step we have to remind if we install the standalone version.
|
|
|
|
Now make the CLU executable:
|
|
|
|
`chmod +x bin/console`
|
|
|
|
And give it a try:
|
|
|
|
```
|
|
% ./bin/console
|
|
Missing config file
|
|
Should I create a new config based on config.json.sample? (y/N): n
|
|
You first have to setup the bindAPI. Bye.
|
|
```
|
|
|
|
Sp now we can head back to our panel and set the Document root to
|
|
/home/users/tfunix/ns1.24unix.net/bindAPI/public.
|
|
|
|
OK, we are finished with the installation and head over to the [4. Configuration](#4-configuration).
|
|
|
|
## 3.2. Installation on a plain debian Bullseye
|
|
|
|
So, at first you should read and understand all steps in 3.1, as we will learn only the differences.
|
|
|
|
We assume that you're on a fresh minimal installation.
|
|
|
|
You need at first to pull some essentials:
|
|
|
|
`apt install git vim wget zsh`
|
|
|
|
To get access to all flavors of PHP sury.org is the perfect match, he's also the official maintainer für the Debian PHP packages (and Ubuntu, as anyone would care).
|
|
|
|
Execute this commands:
|
|
|
|
```apt -y install apt-transport-https lsb-release ca-certificates curl
|
|
wget -O /etc/apt/trusted.gpg.d/php.gpg https://packages.sury.org/php/apt.gpg
|
|
echo "deb https://packages.sury.org/php/ $(lsb_release -sc) main" > /etc/apt/sources.list.d/php.list
|
|
apt update
|
|
```
|
|
We need at leas php-fpm, php-cli, and besides that php-curl, php-xlm and php-mbstring:
|
|
|
|
`apt install ph8.1-fpm, php8.1-cli, and besides that php8.1-curl, php8.1-xml and php8.1-mbstring`
|
|
|
|
We also need MariaDB, the successor of MySQL.
|
|
(Maria is the second daughter of Michael Widenius, guess what, his first is named My.
|
|
So MySQl and MariDB even makes more sense ^^)
|
|
|
|
`apt install mysql`
|
|
|
|
And, we need the webserver, of course:
|
|
|
|
`apt install apache2 libapache-mod-fcgid php8.1-fpm`
|
|
|
|
And enable fpm support:
|
|
|
|
`a2econf php8.1-fpm`
|
|
|
|
Disable the default site:
|
|
|
|
`a2dissite 000*`
|
|
|
|
```
|
|
<VirtualHost *:80>
|
|
ServerName ns1.24unix.net
|
|
ServerAdmin tracer@24unix.net
|
|
DocumentRoot /var/www/html
|
|
ErrorLog ${APACHE_LOG_DIR}/ns1.24unix.net/error.log
|
|
CustomLog ${APACHE_LOG_DIR}/ns1.24unix.net/access.log combined
|
|
|
|
RewriteEngine on
|
|
RewriteCond %{SERVER_NAME} =ns1.24unix.net
|
|
RewriteRule ^ https://%{SERVER_NAME}%{REQUEST_URI} [END,NE,R=permanent]
|
|
</VirtualHost>
|
|
```
|
|
|
|
```
|
|
<IfModule mod_ssl.c>
|
|
<VirtualHost *:443>
|
|
ServerName ns1.24unix.net
|
|
ServerAdmin tracer@24unix.net
|
|
Protocols h2 h2c http/1.1
|
|
DocumentRoot /var/www/html/bindAPI/public
|
|
ErrorLog ${APACHE_LOG_DIR}/ns1.24unix.net/error.log
|
|
CustomLog ${APACHE_LOG_DIR}/ns1.24unix.net/access.log combined
|
|
SSLCertificateFile /etc/letsencrypt/live/ns1.24unix.net/fullchain.pem
|
|
SSLCertificateKeyFile /etc/letsencrypt/live/ns1.24unix.net/privkey.pem
|
|
Include /etc/letsencrypt/options-ssl-apache.conf
|
|
<FilesMatch \.php$>
|
|
SetHandler "proxy:unix:/run/php/php8.1-fpm.sock|fcgi://localhost"
|
|
</FilesMatch>
|
|
<Directory /var/www/html/bindAPI/public>
|
|
Options -Indexes +FollowSymLinks +MultiViews
|
|
AllowOverride All
|
|
Require all granted
|
|
</Directory>
|
|
|
|
</VirtualHost>
|
|
</IfModule>
|
|
```
|
|
|
|
php installer --install-dir=./bin/ TODO
|
|
|
|
/usr/bin/keyhelp-php81 bin/composer.phar update
|
|
|
|
|
|
<a name="configuration"></a>
|
|
# 4. Configuration
|
|
|
|
So, another call of our binary, this time we agree to get a config written:
|
|
|
|
```
|
|
# ./bin/console
|
|
Missing config file
|
|
Should I create a new config based on config.json.sample? (y/N): y
|
|
Config file has been generated. Adjust it to your needs, then proceed to database setup.
|
|
```
|
|
|
|
So, what's in it?
|
|
|
|
```
|
|
cat config.json
|
|
{
|
|
"dbHost": "localhost",
|
|
"dbPort": 3306,
|
|
"dbDatabase": "sampledb",
|
|
"dbUser": "sampleuser",
|
|
"dbPassword": "secret"
|
|
}
|
|
```
|
|
We'll start the installer another time:
|
|
|
|
```
|
|
$ ./bin/console
|
|
SQLSTATE[HY000] [1698] Access denied for user 'sampleuser'@'localhost'
|
|
Did you create the database and adjust the config file?
|
|
|
|
You can create database an user via a panel or manually in mysql shell:
|
|
Created an initial password: T6BpmtNk
|
|
CREATE DATABASE bindAPI;
|
|
CREATE USER 'bindAPI'@'localhost' IDENTIFIED BY 'T6BpmtNk';
|
|
GRANT SELECT, INSERT, UPDATE, DELETE, CREATE, INDEX, DROP, ALTER, CREATE TEMPORARY TABLES, LOCK TABLES ON bindAPI.* TO 'bindAPI'@'localhost';
|
|
There is no need to run FLUSH PRIVILEGES when using GRANT!
|
|
```
|
|
|
|
So, now it offers us the create statements for the needed database.
|
|
If were on plain debian, we just can copy and paste (the password is random) this as root into mysql.
|
|
|
|
If we're using hte panel, lets create a database and write down the credential.
|
|
|
|
Now we can finally begin to populate our configuration:
|
|
|
|
|
|
|
|
<a name="theapi"></a>
|
|
# 5. The API
|
|
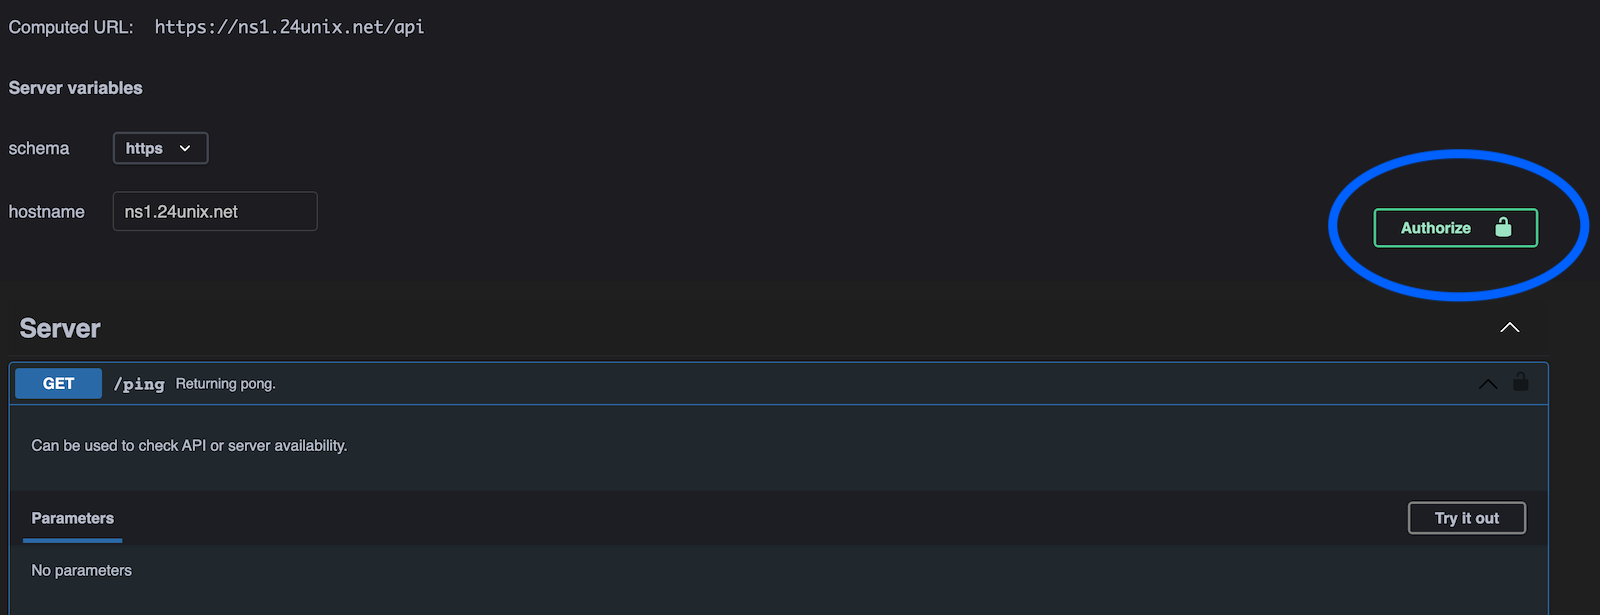
On the site you can authorize with an API key (creation of the key is described later in this document).
|
|
|
|
|
|
|
|
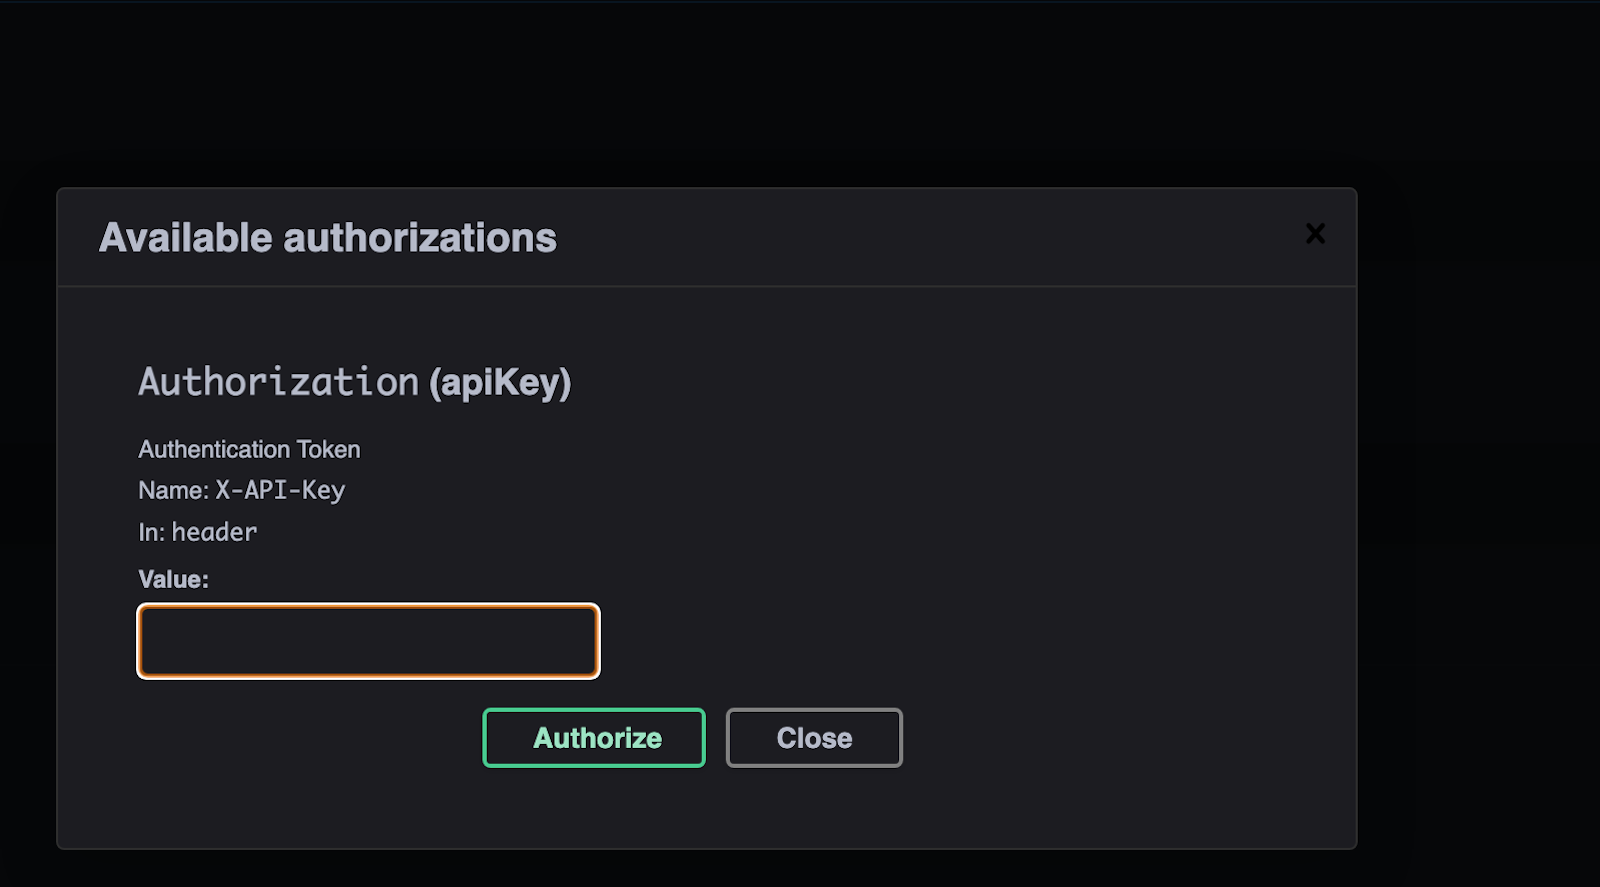
And enter you API key:
|
|
|
|
|
|
|
|
After successful authorization you can use the APi via the OpenAPI Interface, e.g. call the /ping endpoint to check if the API is alive.
|
|
|
|
You have to click on „Try it out“:
|
|
|
|

|
|
|
|
|
|
And then hit Execute:
|
|
|
|
|
|
|
|
|
|
Of course, you can issue the same command in your shell:
|
|
|
|
```
|
|
curl -X 'GET' \
|
|
'https://ns1.24unix.net/api/ping' \
|
|
-H 'accept: application/json' \
|
|
-H 'X-API-Key: 61f27a57c9d1f.[truncated]'
|
|
```
|
|
|
|
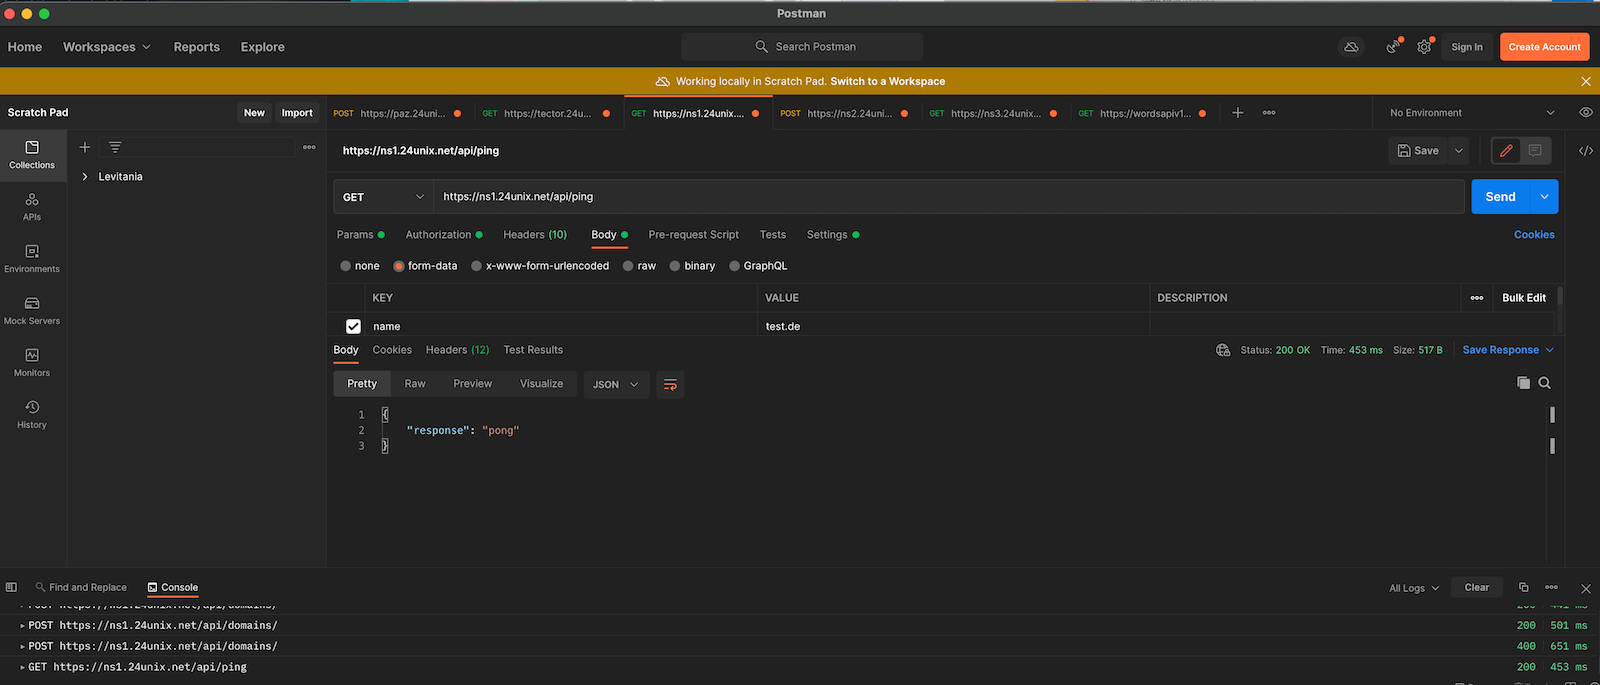
A helpful tool when dealing with API is [Postman](https://https://www.postman.com/), if offers the same options as from the OpenAPI interface or via shell with curl.
|
|
|
|
|
|
<a name="conclusion"></a>
|
|
# 6. Conclusion
|
|
|
|
|